Drawing People: Essential Tips for the Beginner Artist

drawing people title picture - drawing of face with many guidelines and graph background

If you consider yourself a beginner when it comes to drawing, the idea of drawing people is likely to be an idea of anxiety and hesitation.

On the other hand, maybe you are a beginner who does not identify with these fears because you are more motivated and eager to learn how to draw people better. Even so, you have likely experienced many occasions of frustration after your attempts to draw people failed to end with a desirable result.

Drawing people easily and effortlessly really comes down to two things:

  1. You need a little knowledge of some basic fundamentals and,
  2. Maybe you guessed this already…you need to practice, practice, practice!

Just like with most things in life you want to know how to do, if you are aware of a few essential tips about drawing people and you practice regularly, then drawing people will become easier, will require less effort over time, and will become more enjoyable!

In this post, I’m going to help you become more comfortable with drawing people by explaining some key basics for drawing faces, drawing the body, and drawing people doing things in everyday life. Additionally, I will provide links to related tutorials for supplemental practicing opportunities.

Read on to learn more about how to draw people!

Basics of Drawing a Face

In order to draw a face, you need to become familiar with basic proportions of the face and head. You should know about differences between drawing males and females. Ultimately, drawing faces successfully comes down to drawing the facial features like the eyes, nose, and mouth in a variety of ways. This variety allows you to create unique and expressive portraits.

Use the Loomis Method for Basic Facial Guidelines

There’s a lot of advice out there on how to properly break down the proportions of the face. I recommend the Loomis method (from Andrew Loomis, author of the book Drawing the Head and Hands) because it’s standard and simple to follow.

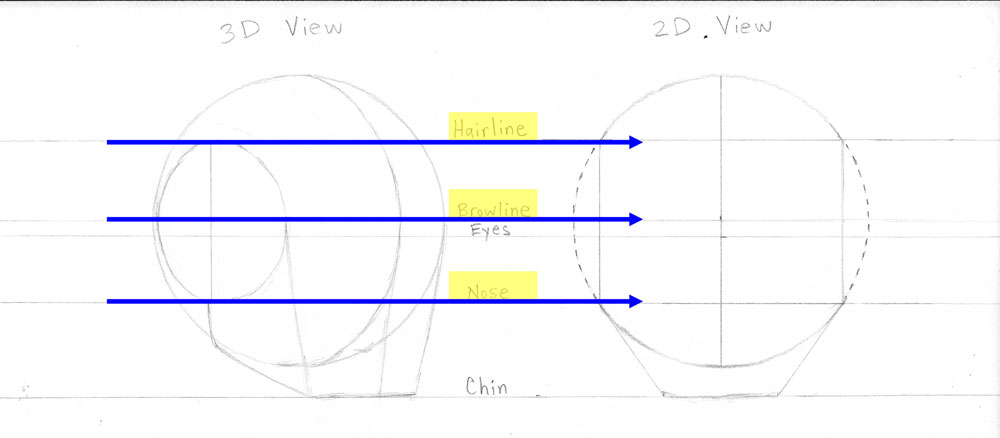
The Loomis method involves thinking of the head as a three-dimensional sphere and jaw. A slice of the sphere is removed from each side of the head. The circular plane that remains is divided in half both vertically and horizontally.

Loomis 3D and 2D view

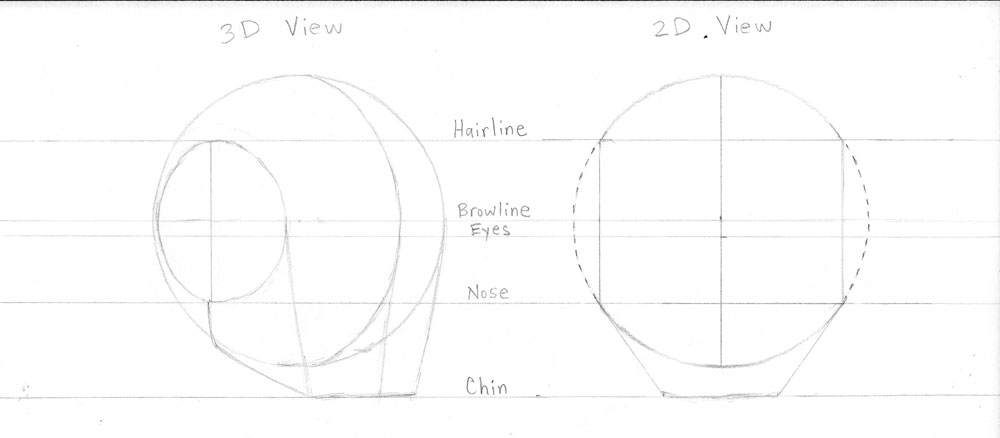
You can use this knowledge to draw a frontal view of a face with a two-dimensional circle instead of a sphere.

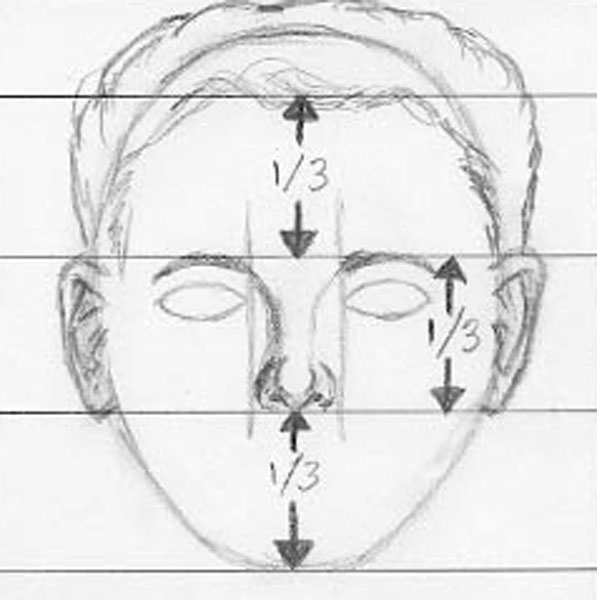
The top of the circle represents the hairline. The bottom of the circle gives us a guideline for the base of the nose. The middle line of the circle is a guideline for the browline.

Loomis hair brow and nose line

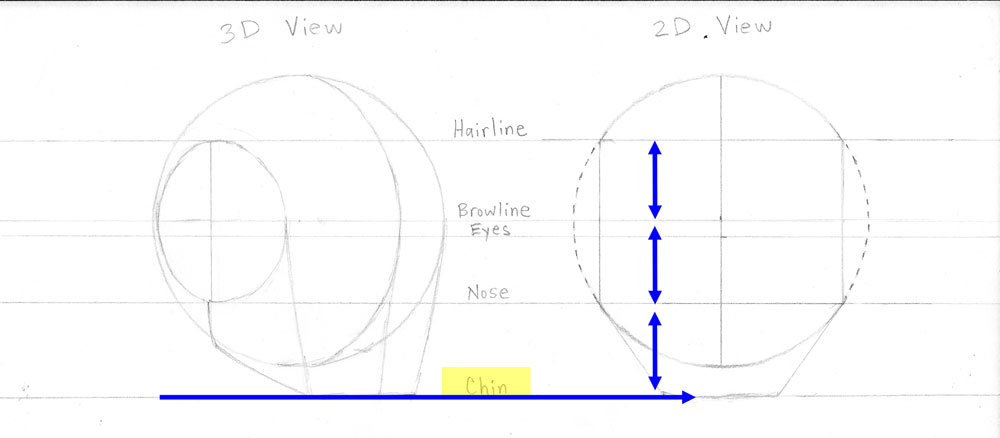
Notice how the length between the hairline and browline is equal to the distance between the browline and the noseline. You can use this distance as a unit of measurement from the nose to identify the proper placement of the chin.

Loomis chin line

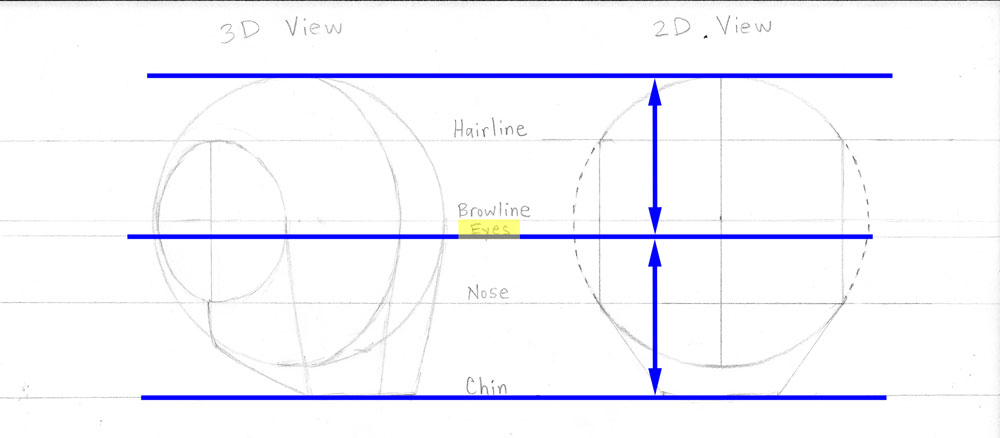
You can draw an additional horizontal line centered between the top of the head and the chin. This line should fall just below the browline. You can use this line as a guideline for the eyes.

Loomis eye placement

The Loomis method gives us a strong foundation upon which to draw a face. Still, there are other guidelines to consider that I will go over in the section below about facial features. When you are ready to draw the face and head in different positions, the Loomis method can be helpful with that too.

Differences Between Drawing Male and Female Faces

If you are wondering whether or not there is a vastly different process between drawing men and drawing women, the answer is … not really. The basic guidelines that you set up for drawing a face like I just outlined will remain the same regardless. Most of the differences you will notice between drawing a woman and drawing a man lie in the facial features.

For example, women tend to have thinner eyebrows that are slightly higher, and men tend to have bushier eyebrows that are slightly lower.

You would probably give more attention to the eyelashes in the drawing of a woman than you would a man.

In general, you would draw a man’s jawline and facial features a little more angular and possibly include facial hair. You would draw the jawline and facial features of a woman a little more rounded.
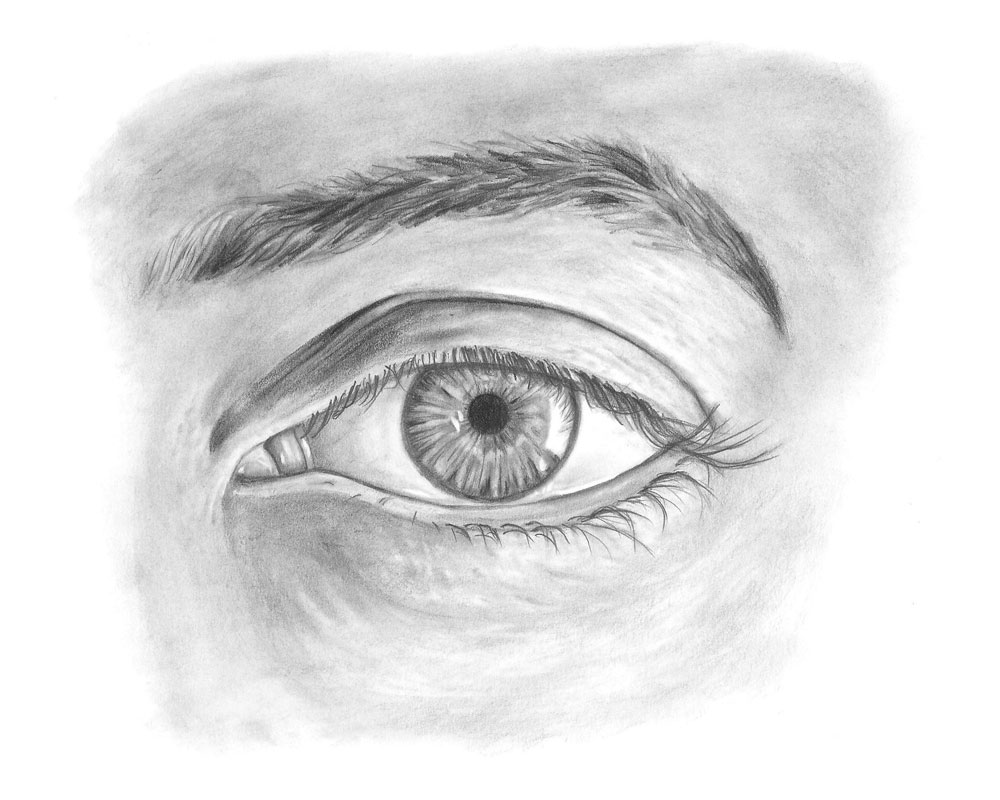
Drawing the Eyes

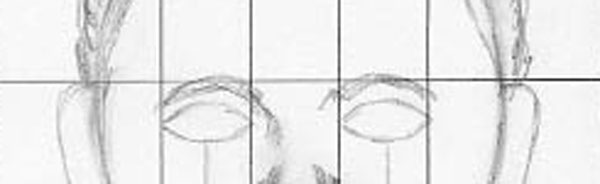
The eyes are placed approximately halfway between the top of the head and the bottom of the chin. If you divide the face into five vertical sections of equal width, the width of the eyes would be equal to the second and fourth section.

eye width

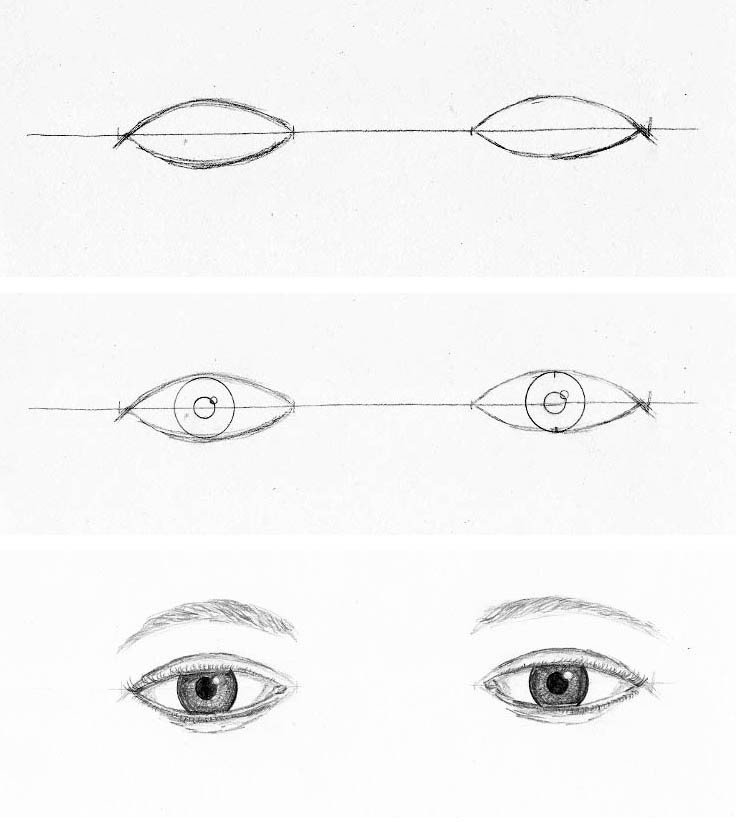
When drawing the eyes, remember that the pupil is a dark hole that should be shaded a very dark value. Draw the iris with light lines radiating from the pupil to the outer edge. Make sure you allow for highlights that overlap parts of the pupil and iris. The white of the eye should not be completely white. This is because there are usually light shadows that the eyelids cast onto it. Eyelashes should be drawn as curved lines that look like they naturally grow from the eyelids. Similarly, eyebrows should be pencil strokes that resemble hair and should be drawn in the direction of hair growth.

drawing people's eyes

Drawing the Nose

The outer edges of the base of the nose generally aligns with the inner corners of the eyes.

nose alignment

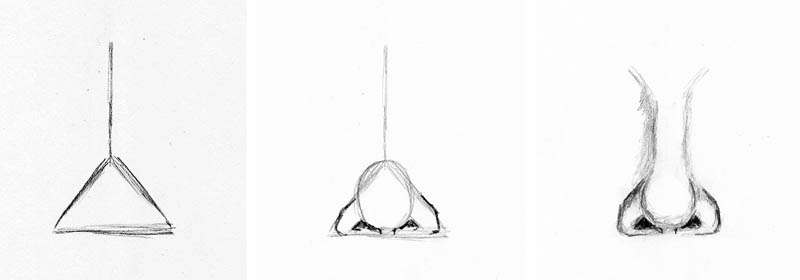
When drawing a nose, you can get started with a straight vertical guideline for the bridge. You can use a triangle for the bottom part. From there, you can use circles to shape the tip and nostrils. You can refrain from drawing a harsh outline for the bridge for a front-view drawing of the face. Make sure you shade the nostrils nice and dark. Look for highlights on the tip of the nose and along the bridge.
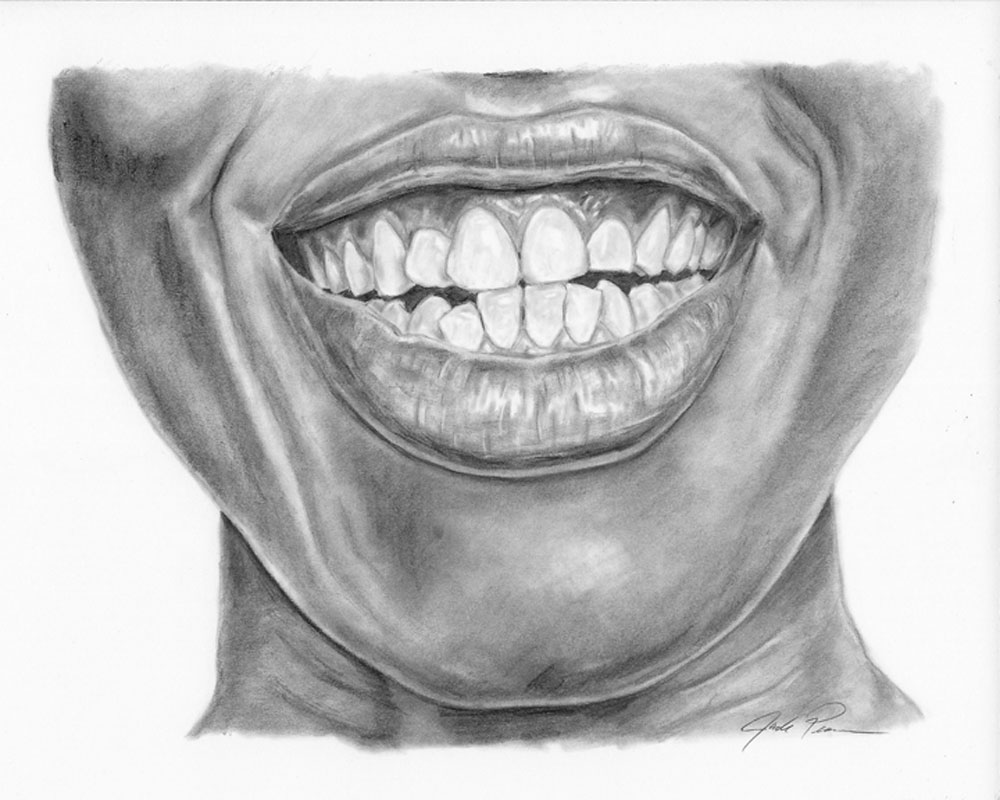
drawing people's noses

Drawing the Mouth

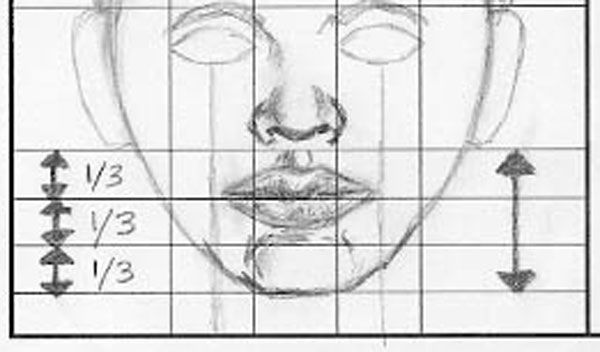
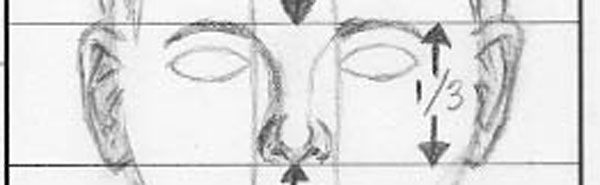
The mouth is approximately one-third of the way down between the bottom of the nose and the base of the chin. The corners of the mouth should align with the center of each eye.

mouth alignment

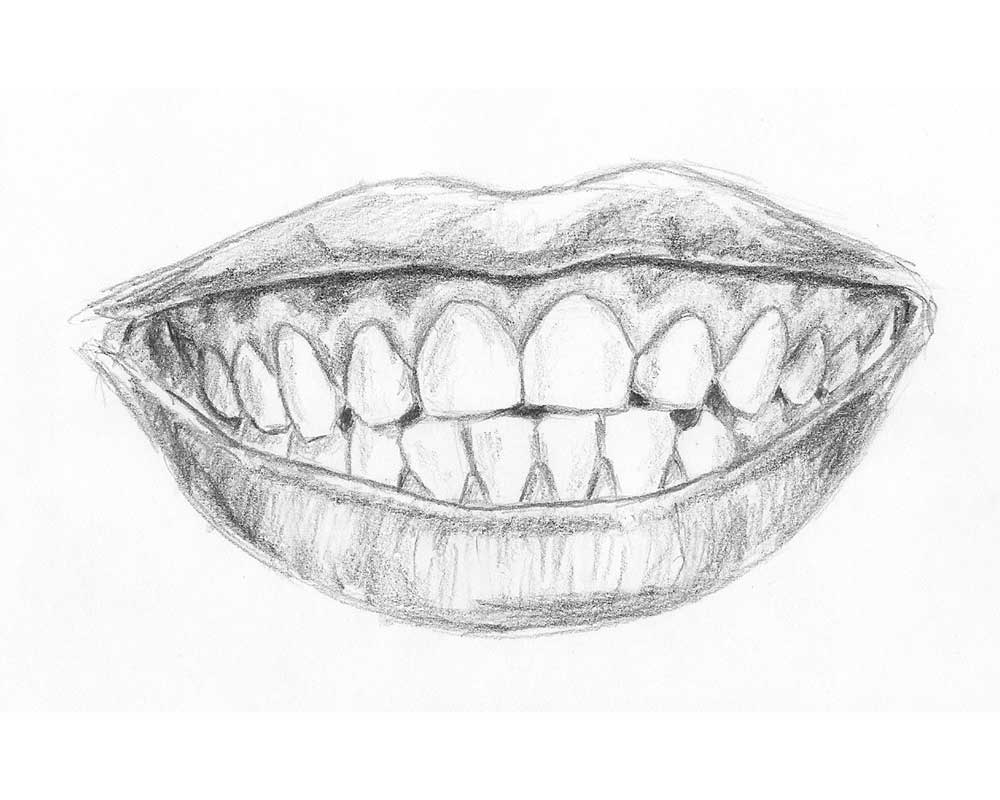
As with every facial feature, look for characteristics of the mouth that are unique to the individual you are drawing. In general, the top lip of a mouth has a little dip along the top and bottom edge. The bottom lip is usually thicker than the top and has more highlights.

drawing people's mouths

Teeth are very unique to each person and contribute greatly to the likeness of a person. Study the shape of the teeth carefully and replicate the shapes and placement as closely as possible. Often, you can get better results from using a grid to draw teeth accurately as opposed to drawing them freehand.
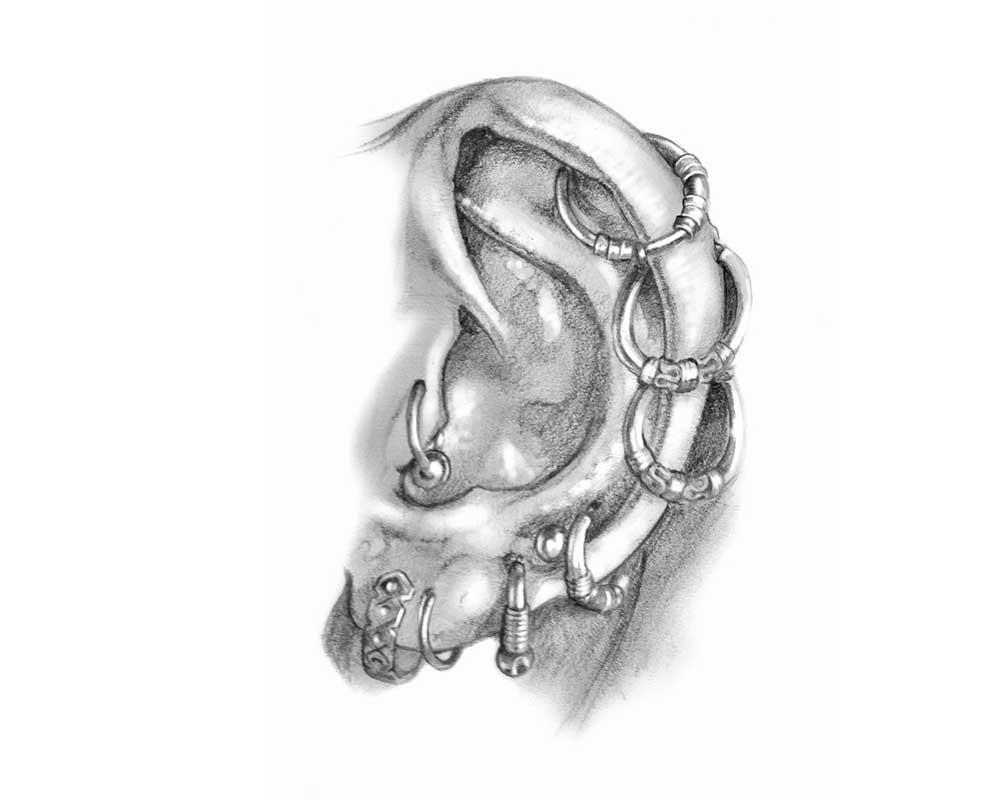
Drawing the Ears

The top of the ears are aligned with the browline. The base of the ears are aligned with the base of the nose. In a profile view, the ear is positioned in the center of the head.

ear alignment

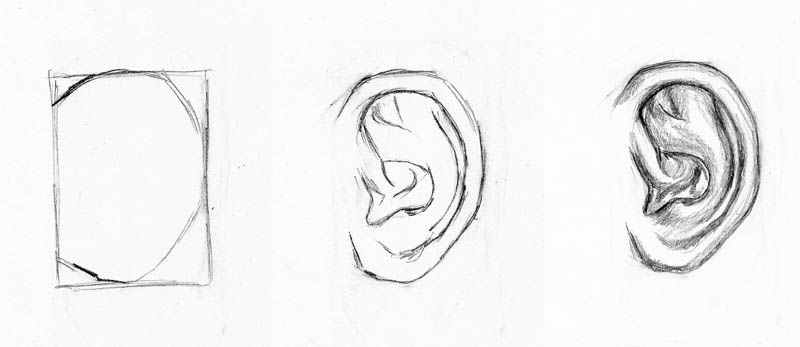
Although each ear is shaped differently, all ears have the same basic structure. Study the curves and twists of the outer ear and practice drawing them repeatedly. Like with anything, drawing ears becomes much easier with practice.

drawing people's ears

Drawing Hair

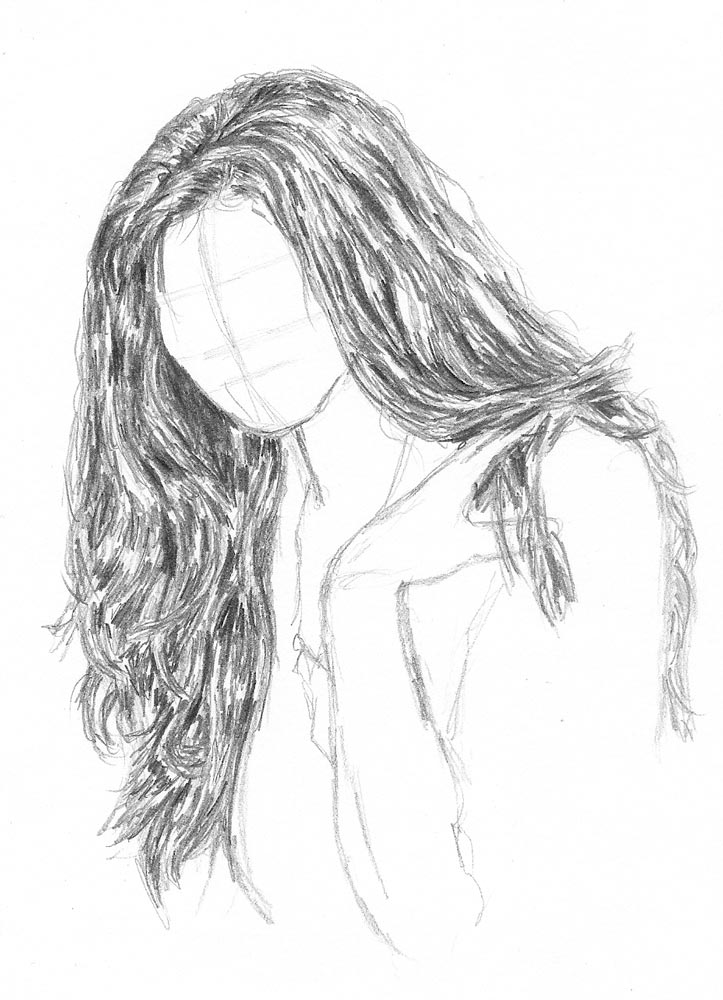
The guideline we sketched earlier for the hairline serves as a basic starting point. People have hairlines that may be slightly above or below this guideline. For someone with a full head of hair, you will have to draw the top of the hair higher than the top of the head.

When you draw hair, make sure to draw the strands in the general direction of hair growth. It is not necessary to draw every single strand. Instead, group sections of hair together as you draw and work on building up layers of light and dark tones.

drawing people's hair

Every Face is Different

All of the ideas presented here are general guidelines. You must remember that each facial feature is unique from one person to the next. Also, the manner in which you draw these facial features will change based on the position of the face and expressions.

Drawing Faces Tutorials

Here are links to a few tutorials on how to draw facial features in a realistic manner.

how to sketch lips and teeth featured image
In this tutorial, I will show you how to sketch lips and teeth that better match a reference photo and Read more
how to draw ear piercings featured image
Learn how to draw ear piercings realistically, basics for drawing an ear, and creating metal and skin textures with light Read more
how to draw a realistic eye featured image
You may be wondering, "How do you draw a realistic eye with pencil?" The eye definitely has a unique complexity Read more
how to draw a mouth step by step
In this post, we are going to learn how to draw a mouth step by step! If your goal is Read more

Basics of Drawing People’s Bodies

Drawing people involves more than just drawing the face. Now let’s learn a little more about how to draw the human figure.

Many people who tell themselves they don’t know how to draw resort to the classic stick figure to draw a human body. Believe it or not, the stick figure does have its place when it comes to drawing the body. Just like when we used guidelines to draw the face, using a stick figure gives us a foundation upon which to build the rest of the drawing. Another option is to sketch basic round shapes instead of stick lines.

Regardless of which method you use, having knowledge of simplified body proportions is a must.

Simplified Proportions of a Human Body

To keep things simple, we will use the typical model of eight heads being equal to the height of a male. Please keep in mind that this model is from the Renaissance era. People in reality are more like around seven heads tall rather than eight. The eight-heads model is easier to explain and usually simpler for beginners to grasp. Just like I said before, this is meant as a guide, not a rule.

Here I have a piece of paper with lines marking off eight equal sections. The bottom of each section is marked 1-8.

body proportions with 8 head tall
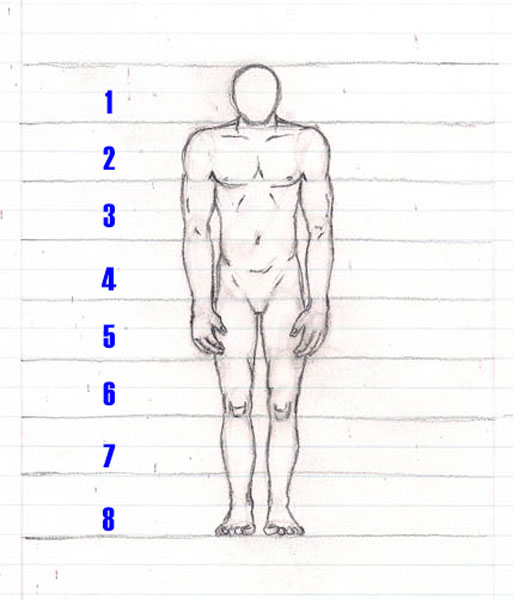
  • Notice that I have drawn an oval for the head with the chin resting at line 1.
  • Now there’s a line from the chin down to line 3, where we find the belly button. Also, you can find the shoulders between lines 1 and 2.
  • Next, the pelvis is between lines 3 and 4.
  • Continuing downward, the bottom of the knees are found at line 6, and line 8 is the ground.
  • As for the arms, the elbows are at line 3 with the belly button. The wrists are at line 4. The fingertips are halfway between the thighs at line 5.
  • The upper legs go slightly inward from the hips to the knees.
  • Use can use line 2 to place the nipples and help with placement of the chest.

A few extra details can help the body drawing to take a more recognizable appearance.

Other Factors to Consider When Drawing the Body

That was a quick overview of how to draw the body, which is helpful for sketching practice and building familiarity and comfort with figure drawing as a beginner.

As you build your confidence with drawing bodies, you will find that you will rely less on the eight-head framework and more on realistic representations.

There are many other things to consider. One factor is whether you are more interested in drawing clothed or unclothed figures.

If you wish to draw figures with little to no clothes, it would be helpful to learn more about anatomy. This way you can have knowledge of and better placement of muscles and visible bone structures. If you want to draw full-length portraits or character studies of people from everyday life, it would be beneficial to learn about clothing and the different types of folds found in fabrics. Whichever your preference, make sure you get lots of practice!

Drawing Figures Tutorial

Here is a tutorial for you to try that involves drawing the human figure.

how to draw a woman in a dress featured image
We will see how to draw a woman in a dress, spinning around in a field of grass, with step-by-step Read more

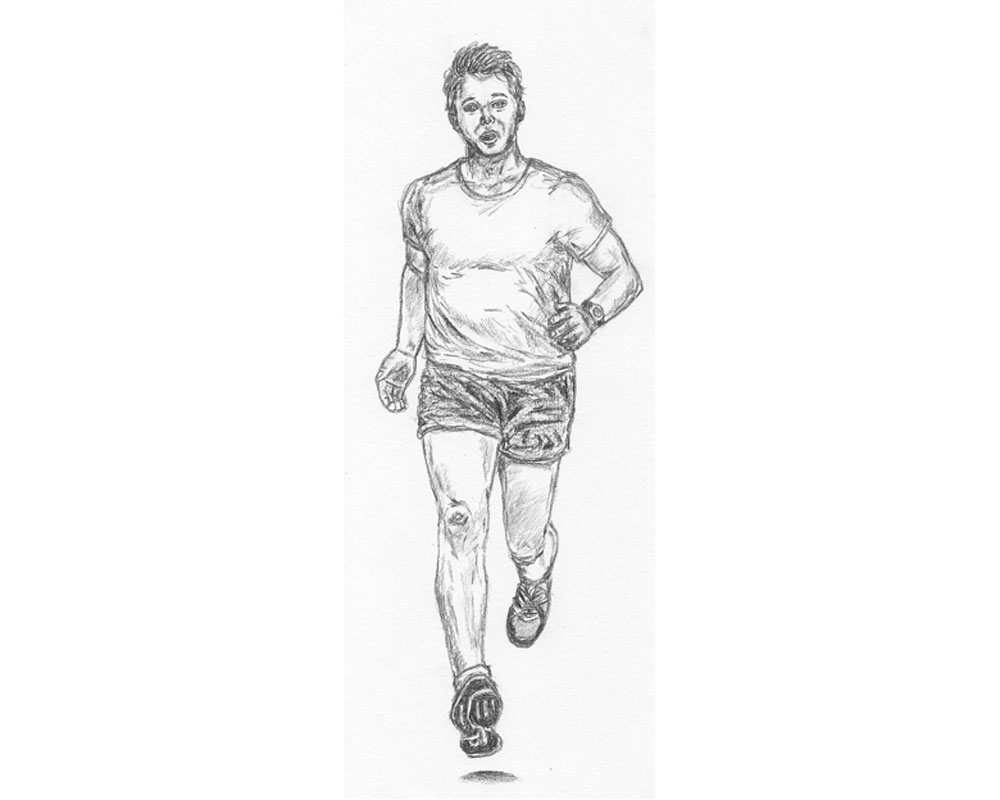
Basics of Drawing People Doing Everyday Things

So far, we have learned how to draw the face and how to draw the body separately. What about drawing the face and body together in everyday situations?

At some point, you are going to want to draw more than just a face looking back at you. You will want to draw more than a body just standing there.

At some point, you will want to put life into your drawings. You will want your drawing to tell a story.

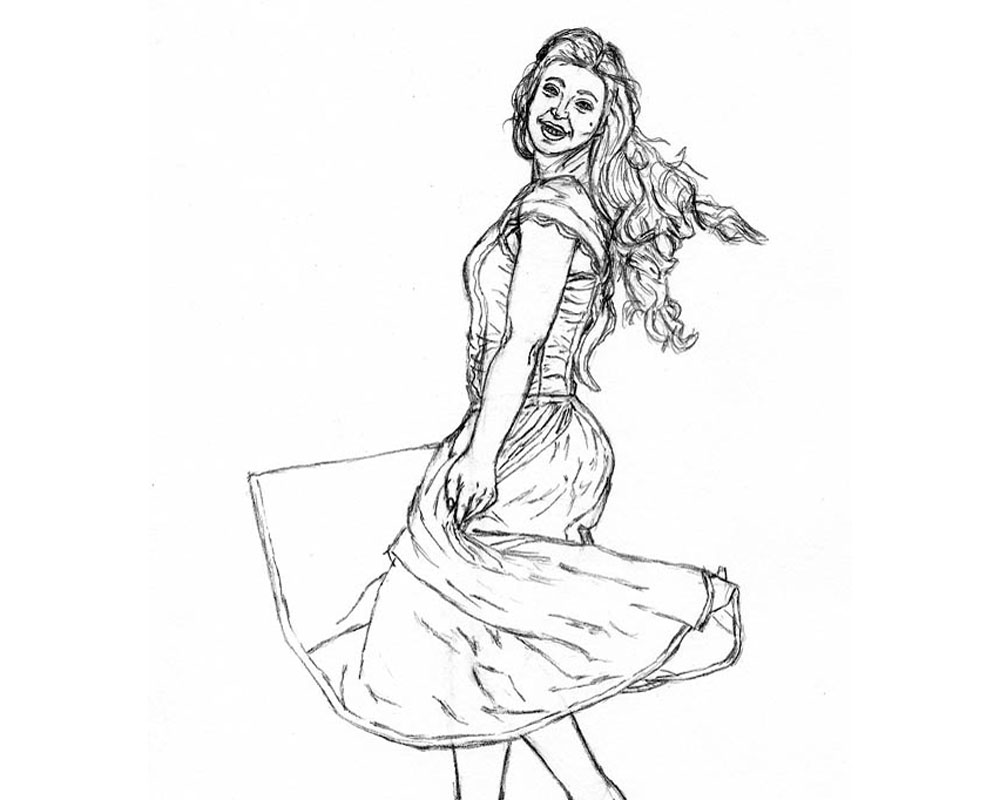
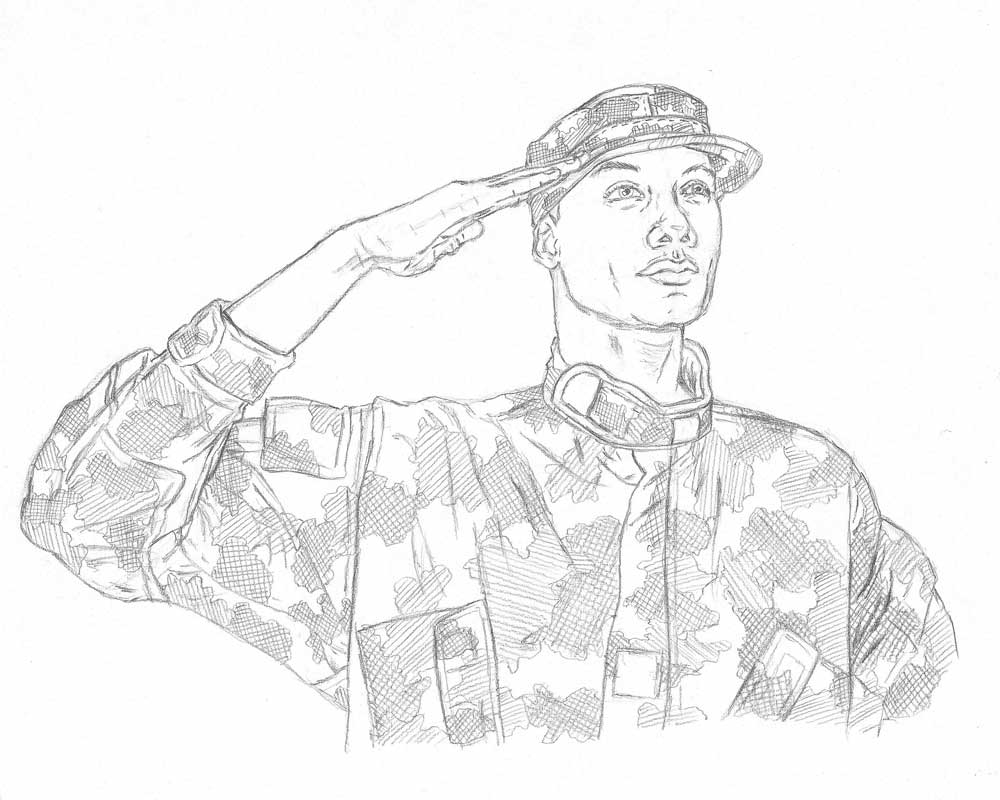
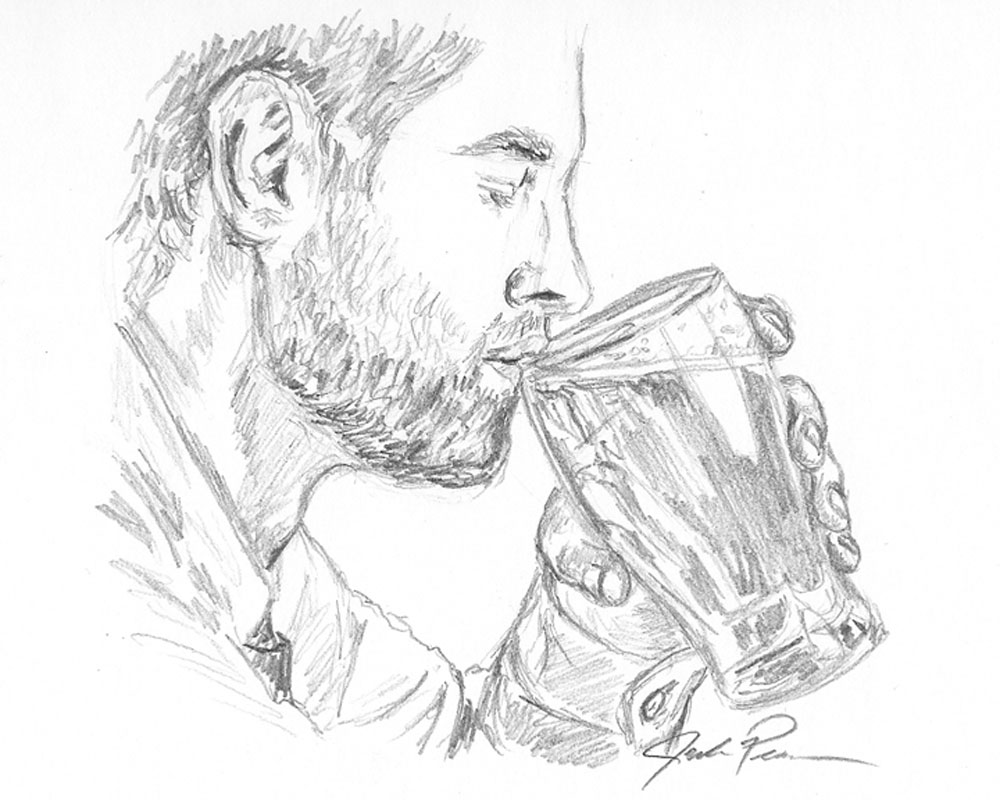
A great way to achieve this is by breaking out of your comfort zone and drawing people doing everyday activities.

drawing of someone eating a breakfast bar

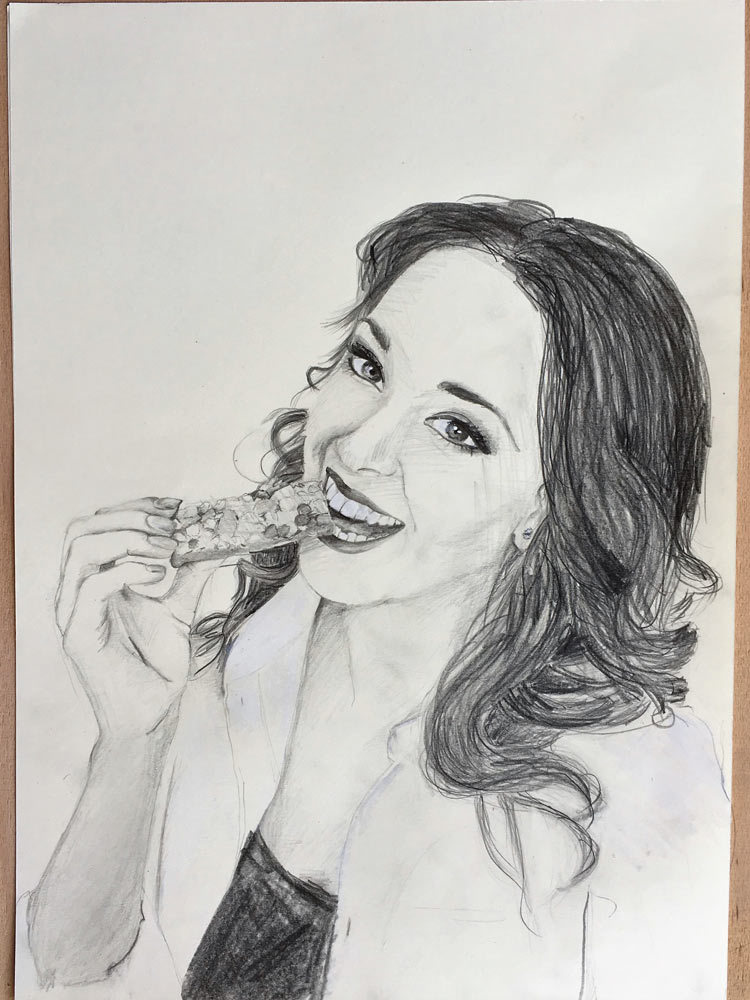
Loosen Up with Gesture Drawing

Gesture drawing is a fantastic way to get into the habit of drawing people in different positions. I think it’s a great method for beginners to transition into more realistic drawings of people in different poses as they are engaged in various pastimes.

Gesture drawing allows you to sharpen your powers of observation. It allows you to capture the form of people in different poses or while they are performing numerous actions. Gesture drawing is traditionally done using the help of a live model, but there’s nothing wrong with using photographs instead.

The idea is to sketch a person holding a pose for no more than 5 minutes. Try to capture as much of the pose as you can with a loose sketch of the form. You are not allowed to erase, and you should not expect perfection from your final result. You should, however, learn from each session.

If you make a habit of doing it for a few minutes each day, gesture drawing can do wonders to build your confidence with drawing people doing things you witness every day in the outside world.

Going Beyond Gesture Drawing

You can use some of the same principles of gesture drawing and expand upon them to draw people doing everyday things.

The way you can do this is to disregard the time limit from gesture drawing, but keep the elements of observing and drawing basic shapes to get you started. Then, you can build on those basic shapes with more details and even shading to create a more realistic drawing.

Think back to earlier in this post when we learned about stick figures and basic shapes.

You can begin by sketching a stick figure performing a particular action. Then, you can sketch over those stick lines with basic shapes to represent the limbs and other parts of the body. After that, you can add details to better define and transform the basic shapes into what they are meant to represent. Finally, you have the option to add shading and finishing touches.

drawing of a runner from basic steps to finished

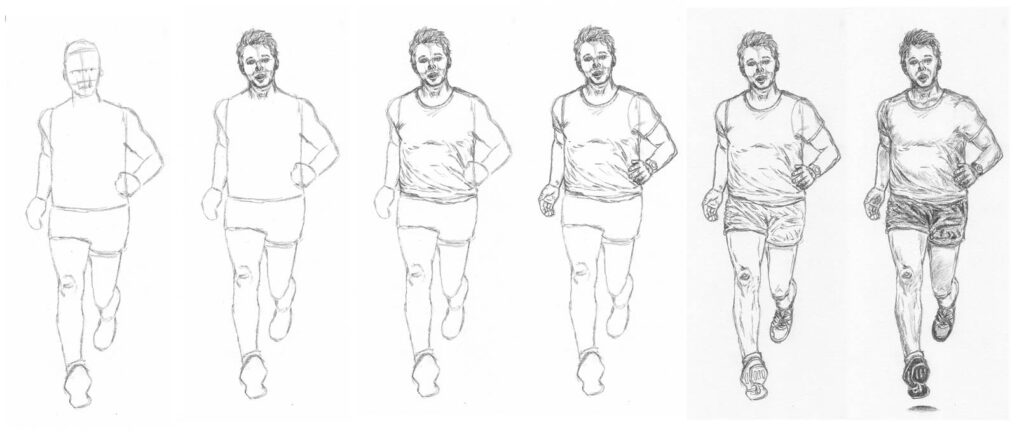
Starting from a stick figure is just one way to tackle drawings of people that include the head and body. As you practice more and more, you drawings will become more accurate and realistic even if you are just observing your reference. To achieve even more realism, consider using other techniques that ensure more accurate proportions, such as using plot points or using a grid.

Drawing Tutorials of People Doing Things

Here are links to tutorials about people doing some very common activities.

how to draw an army man featured image
Have you ever wanted to know how to draw an army man giving a salute? It does not have to Read more
how to draw a man running featured image
When you are just learning how to draw people, being able to draw a motionless, standing figure can be hard Read more
how to draw someone drinking
In this drawing tutorial, we're going to see how to draw someone drinking a glass of beer. Why did I Read more

Conclusion

People are my favorite drawing topics. Throughout the course of my life, the subjects of my drawings have centered around people far more often than any other drawing subjects.

Keep in mind that there are many styles, techniques, and approaches to drawing people. The more you practice, the more you will develop a style that is unique to you.

You may even discover that you stop calling yourself a beginner and you start calling yourself a portrait artist sooner than you realize!

[adrotate banner=”4″]

How to Draw an Army Man Saluting

Home » Draw People » Drawing People: Essential Tips for the Beginner Artist
how to draw an army man title

Have you ever wanted to know how to draw an army man giving a salute?

It does not have to be Memorial Day, Veterans Day, or any other patriotic holiday for us to have a reason to honor our troops!

Drawing something relating to military life could be a nice gesture or way to recognize a special veteran in your life. Keep this in mind any time you are searching for ideas about what to draw.

In this tutorial, you will learn an easy way to draw an army man saluting.

Use a Reference Photo of an Army Man

Below is a reference photo that will come in handy. It definitely came in handy for me. Even though I myself am an Army veteran, it has been nearly 20 years since I last wore a set of fatigues, also known at the time as BDU’s (or Battle Dress Uniforms). I have since learned that there have been a lot of changes! As of 2004, they were called ACU’s (or Army Combat Uniforms) and looked like this:

Now I have learned that they have changed again. Since 2019, soldiers have been wearing a new uniform with a pattern called OCP (Operational Camouflage Pattern).

So even though the reference photo for this tutorial has an outdated uniform, that’s okay! We will still use the reference to draw the soldier and the basic shape of the uniform. As for the camouflage pattern, I will show you how to draw it in a more generic style that can still be representative of a soldier’s uniform. This way, you will always be able to draw a camo pattern, even when the current uniform changes to something different.

Materials Used for This Drawing

Here is a list of the materials I am using for this drawing.

If you don’t have some of these materials, that’s okay. You can still make do with a regular pencil and eraser, as long as you just get started!

If you wish to purchase any of these materials, they can be found at your local art store, or you can buy them using the links below.

Affiliate Disclaimer: The links below are affiliate links. I will receive a small commission if a purchase is made through one of these links. Learn more here.

I will begin this tutorial by showing you some basic shapes you can draw by freehand. We will use these shapes as guidelines for the head, neck, body, and arm. To ensure you draw these guidelines in the proper shape, size, and position on your paper, you can use a grid as you draw along with me. If you do so, here are a few more materials that will help you transfer the grid and the image onto your drawing paper:

The grid template and gridded reference photo are available to all my newsletter subscribers. You can sign up and grab a copy of each by clicking the link below!

Free Bonus: Click here to download the grid template and gridded reference photo of the army man. Along with these resources, I will give you some simple tips for using the above materials to transfer the grid onto your drawing paper. This will allow you to more easily and effortlessly draw along with me in this tutorial.

Draw the Basic Outline of the Army Man

Draw the basic shape for the head. As you can tell from the photo, this is not a direct frontal view but rather a quarter-turn view. Account for this as you sketch the head shape by planning for the side of the face on one side and the back of the head on the other.

draw the head outline

Next, draw the contour outline of the neck and the collar. Make the front of the neck come down just below the chin area. The collar will be just about as wide as the head.

draw the neck and collar outline

Draw the basic shape for the torso below the base of the collar. This shape can be roughly compared to a square shape but with a slight bend downward for the left shoulder. Then begin sketching the outline of the soldier’s left sleeve.

draw the body outline

Now let’s begin to sketch the shape of the saluting arm. A salute is formed with the upper arm parallel to the ground. To draw the outline of the upper sleeve, extend the line from the upper shoulder to the soldier’s right (our left). For the bottom of the sleeve, draw a diagonal line from the lower part of the visible torso toward where the elbow will be.

draw the upper arm outline

Before drawing the forearm, sketch a straight guideline to ensure the angle of the forearm will position the hand between the middle and top of the head.

find the angle of the forearm

Now we can sketch the outline of the forearm, including the cuff of the uniform and the contour of the hand. A salute is formed with the fingers of the hand extended and meeting the eyebrow. Draw the fingers overlapping the head outline so the fingertips can touch the area where the corner of the eyebrow will be.

draw the finished outline of the army man

Draw Guidelines to Place Facial Features

Before we draw the eyes, nose, and other facial features, let’s mark some basic guidelines to help us place these features on the face of the army man. Begin with a vertical line down the center of the head that follows the curvature of how the head is formed. Again, since the face is turned, your guideline going down the center of the face should reflect the direction the soldier is facing.

draw a vertical guideline on the face

Draw a horizontal guideline for the eyes roughly halfway between the top of the head and the chin. Since the soldier’s chin is slightly up, notice the upward curvature of the eye guideline as the head is tilted back. Then, approximately halfway between this eye guideline and the chin, draw another horizontal guideline with a similar curve. This line shows us where to draw the base of the nose.

draw a guideline for the eyes and nose

Along the eye guideline, sketch four very short marks to represent the corners of the eyes. Normally, if we look at a face directly from the front, we see that the eyes are equal in width. However, the turn of the head gives us some foreshortening that makes the farther eye appear slightly smaller than the closer eye. The turn of the head also makes the farther eye appear closer to the bridge of the nose.

draw guidelines for the eye corners

Under the guideline for the nose, sketch a guideline for the mouth. This guideline should be about one-third of the distance between the nose guideline and the chin.

draw a mouth guideline

Finish up the guidelines by drawing vertical lines from the inner corners of the eyes to the nose guideline. This gives us an idea of the nose width. As for the mouth, the corners can generally be located directly below the center of each eye.

draw finished guidelines on the army man

Draw the Eyes

For the facial features, we’ll begin with the eyes. Draw the outline of the eyes first. Eyes are usually somewhat almond-shaped, but in this case, we must draw a slightly upward curve to the bottom edge as well as the top. This is due to the upward tilt of the head. Also remember that because of foreshortening, the soldier’s left eye (on our right) will be slightly smaller. Then draw the outline of the iris and a tiny, off-centered highlight within each one. After that, draw a circular pupil centered in each iris. Finish up with the eyelids and short, barely noticeable eyelashes.

If you need more help drawing eyes, you will find some extra tips in this detailed eye tutorial. It will also cover how to draw realistic eyebrows. We will draw simpler eyebrows to go along with the simplified eyes for this drawing in the next step.

draw eyes on the army man

Draw eyebrows above each eye. Begin with a curved line to plan the shape and position of each eyebrow. Next, working from the inner tip of each line, draw short hairs alongside each side of the line to build up the volume of each eyebrow. There’s no need to make them too thick!

draw eyebrows on the army man

Draw the Nose and Mouth

Next, draw the nose. Start by forming the base of the nose. Use guidelines from the inner corners of the eyes to place and shape the wings around the nostrils. Then begin sculpting the ball of the nose and the nostrils themselves. In this case, our army man’s nostrils are somewhat triangular in shape.

draw the bottom of the army man nose

After that, draw a line to connect the ball and bridge of the nose. Curve this line slightly toward the soldier’s left eyebrow (on our right). Lightly sketch the outline of a subtle highlight on the ball of the nose. Draw additional details like light marks on the other side of the bridge and a curved line to indicate the eye socket.

draw the finished nose on the army man

Under the nose and along the guideline for the mouth, start shaping where the upper and lower lips meet. You can do this by sketching a line that curves slightly up from each outer end and then has a slight dip downward in the center. Then draw a curved line for the top lip, again with a dip in the center, also known as Cupid’s bow.

draw the top lip

Finish the mouth by drawing a curved line for the bottom lip, the vertical philtrum between the nose and upper lip, and a curved line below the lower lip to mark the top of the chin. See this article if you are interested in learning more about how to draw a mouth.

draw the finished mouth of the army man

Draw the Ear, Jaw, Neck, and Hand

Finish the face by drawing the ear, jawline, and neck. Let’s start with the ear, which is found between the guidelines for the eyes and the bottom of the nose. Draw the outer contour of the ear followed by the lines shaping the various grooves and twisted cartilage that make up the ear. Notice also that I sketched a line from the top of the ear to represent the bottom edge of the hat, which we will draw soon. The soldier’s hat is preventing his fingertips from touching the side of his eyebrow during his salute. Therefore, you should draw this line going between the fingers and the eyebrow, as shown.

draw the ear

Shape the jawline by drawing a curved line from the earlobe to where the chin will be. Then define the chin and the muscles of the jaw that surround the mouth.

draw the jaw and chin

Define the outline of the neck. Then add a few details, including a funnel shape to indicate the Adam’s apple The collar of the jacket will be drawn just below the neck later.

draw the neck

Then begin adding details to make the hand. Draw the fingers extended straight, but put very slight bends in the knuckle areas to make them appear more natural. Don’t forget the fingernails, too!

draw fingers of the army man

Make a few visible lifelines on the palm underside and a few wrinkles along the wrist and the side of the hand for a touch of realism.

draw the finished hand of the army man

Erase Guidelines and Grid Lines

At this point, you can erase the guidelines that helped you draw the face of the army man. A kneaded eraser will be useful for erasing in tight spots without erasing important elements of the drawing itself.

begin erasing guidelines

Now would also be a good time to erase any stray marks that may be present on your drawing paper. You can use a rubber or plastic eraser to quickly cover broad areas of the paper.

finish erasing stray marks

[adrotate banner=”3″]

Draw the Hat and Collar

In order to draw a military man properly, we need to draw the uniform! We can start by drawing the hat and collar. First, the hat. Look at the reference photo to see how to properly shape the top of the hat.

begin drawing the hat

Draw the brim of the hat going from the fingertips to the eye on the other side of the face. Additionally, we can see a little bit of the top of the brim.

draw the hat brim

Finish drawing the outline of the hat. Draw the seams separating the different pieces of the hat. Draw stitching along the seams to make it appear sewn together like real fabric.

draw the hat on the army man

Next, draw the collar along the bottom of the neck. Begin with the basic outline of the collar, including the flap that curves around the front.

begin drawing the collar

Then draw a couple of squares to represent the fastening patches on the front of the collar. Finish drawing the seam around the outer edge and add a couple of subtle wrinkles near the collar’s center.

draw the finished collar outline on the army man

Draw the Jacket Body

Begin to sharpen the outline of the jacket body. Then draw details on the soldier’s left sleeve. Include folds in the material as well as pockets or patches.

begin to draw the jacket of the army man

Continue to use the reference photo to draw the general design of the uniform. This includes noticing where parts of the jacket are fastened and how the pockets are angled. You can use tilted rectangles to draw many of the army guy’s pockets.

draw the right side of the jacket

Don’t forget to make a few well-placed folds that are always found in clothing. One prominent fold you should notice here is the drop fold formed as the soldier’s shoulder pulls at the upper end of the jacket material. Continue to draw smaller folds, seams, and pockets until the jacket body is complete.

draw the finished jacket body of the army man

Draw the Jacket Sleeve

Use a similar process as you draw the sleeve. Beginning with the cuff, draw the general shape and where the cuff overlaps.

draw a cuff on the army man sleeve

Keep looking specifically for pockets and folds. There appears to be a pocket on the outer forearm area and another pocket near the bicep. Then you can draw a slightly curved diagonal line to represent a long fold stretching from the bicep to the armpit.

draw a pocket and sleeve fold

Finish the sleeve by drawing seams for the overlapping fabric of the uniform. Draw a lighter line or light dotted line where appropriate to show the stitching along the seams. Draw a few more folds as well. Notable folds include a few near the cuff and some where the arm bends and the fabric bunches up. Also, don’t forget to draw a couple of straight lines to make folds radiating from the elbow.

draw the finished jacket sleeve of the army man

Draw Camouflage Pattern on the Hat

Now it is time to begin adding a camouflage pattern to the uniform. The following video is an excerpt from the full-length video version of this tutorial. Watch it to learn how to draw the camouflage pattern on the hat of the Army man. If you prefer, you can continue with the written directions and step-by-step pictures below the video.


The goal for this drawing is not to replicate this complicated pattern perfectly. Instead, we can sketch some very basic shapes and use a combination of hatching and crosshatching to make a simplified camouflage pattern that resembles the real thing. Here’s how to draw camouflage step by step. Starting with the hat, draw the outline of a few irregular shapes that will be dark spots in the camo pattern.

begin drawing camo on the army man hat

Next, draw a crosshatch pattern within each irregular shape of the hat. A crosshatch pattern is simply a series of parallel lines going in one direction with another series of parallel lines overlapping and going in a direction that is perpendicular to the first set of lines.

shade the camo on the hat

Still working on the hat, let’s now draw some more irregular shapes between the dark spot that we already have. Don’t fill the entire surface with spots. Leave some of the open areas free from your irregular shapes.

draw more camo outlines

Finally, draw a hatch pattern within each of these new irregular shapes. A hatch pattern is a series of parallel lines going in one direction without the second perpendicular series overlapping them, as in the crosshatch pattern.

draw the finished camo hat on the army man

Draw Camouflage on the Sleeve

Now that you know how to draw a camo pattern, let’s do the same thing to draw camouflage for the sleeve. Make some basic abstract shapes for the darker spots. Try drawing a combination of straight and round edges and corners as you form the shapes. It’s also a good idea to stop drawing a shape along the edge of a seam or fold, or you should at least shift the positioning of the shape. This is because these edges can represent overlaps or interruptions in the visible flow of the fabric.

outline the dark camo on the sleeve

Use a crosshatch pattern to fill in these shapes. This crosshatch pattern can represent the darkest spots of the camo pattern. Also, it’s okay to vary the angle of the parallel lines you draw from one crosshatched spot to another. Just remember that the second series of overlapping lines within each specific spot should be perpendicular to the first series of lines.

shade the dark camo

Draw similar shapes to represent the lighter spots, just like we did when we drew the hat of the army man. Remember to use a hatch pattern rather than a crosshatch pattern to fill the shapes.

draw the finished camo sleeve on the army man

Draw Camo Print on the Jacket Body (Darker Spots)

Now draw camo print on the rest of the uniform using the same process. Begin by defining the outline of the irregular shapes that will be the darker spots of the pattern. Try to spread the spots out evenly.

outline dark camouflage on the jacket

Then, use crosshatching to shade these darker spots on the jacket body of the uniform. If you get to an area where folds in the clothing overlap the crosshatch pattern, you can trace over those folds so they stand out more easily against the crosshatching.

shade dark camo on the jacket

Draw Camo Print on the Jacket Body (Lighter Spots)

Now draw the lighter spots of the camo print on the left side of the jacket body. Add a number of lighter spots that are approximately equal to the number of darker spots. Remember to use hatching to shade these lighter spots. You should also have a good balance of unshaded space on the jacket’s material, too.

outline light camouflage on the jacket

Draw these lighter spots with hatching on the right side of the jacket body to complete the uniform and the drawing.

And that is how to draw an army man saluting!

how to draw an army man final result

Tutorial Recap

For a quick visual recap of this tutorial, take a look at the image below. It shows you a progression of the main steps for how to draw the army man.

how to draw an army man recap

Finishing Thoughts

Let me point out again that the process for drawing the camouflage pattern is not meant to be perfect, but it is at least easier than trying to spend hours or days replicating the real thing, and it has a close enough resemblance.

The hatching and crosshatching shading method I used in this tutorial is just one option. You can always use the approach of traditional shading with varying values and grades of graphite, which would be more appropriate if applying realistic shading to the entire drawing. For the purposes of this tutorial, since it is mostly meant to be a line drawing, I thought the hatching and crosshatching methods would be a nice complement to the line drawing.

Of course, the amount of time you choose to spend on your drawing is up to you. Devoting more time will result in a more realistic and accurate representation of the uniform pattern and the drawing in general.

Whether it’s a man or woman in the Army or another branch of military service, there is still much value in having a reference photograph when you draw any person in a uniform. Even if the uniform pattern is not an exact match, the reference will help you stay true to the uniform’s basic design (sleeves, collars, pockets, etc.). Also, drawing the face and hands becomes much easier when your reference is close by.

I hope you have fun while drawing this soldier and honoring our troops!

[adrotate banner=”4″]

How to Draw a Man Running

When you are just learning how to draw people, being able to draw a motionless, standing figure can be hard enough. But what if you wanted to draw a full-length figure in motion? What if you wanted to draw, say, a man who is running?

Even if you have learned the basic proportions for drawing a standing person, there are a few changes to consider when drawing a person running. The limbs are in constant motion and opposing positions. Not only that, but we also have to remember that arms and legs will appear different when they are closer to us or farther away from us.

In this tutorial, you will see how to draw a man running. Even though running is very different from standing, you will see that drawing a man running is not drastically different from drawing a man standing still. Just a few simple tweaks and you will be on your way. So with that said, let’s get started!

Sketch a Basic Outline

The first step is to draw a rough outline of the running man. Keep standard proportions in mind for the head and torso. You can even sketch in some guidelines to draw the face later.

draw outline of man running

Now as for the arms and legs, the limbs are alternating. You see in this example that the runner’s left arm and right leg are out, while the right arm and left leg are to the rear. Here is where things might get a little confusing. You will need to foreshorten the arms and legs. This will cause them to appear distorted and out of proportion with each other. However, this is necessary to create an illusion of depth.

Foreshortening the Arms

The right upper arm appears very short compared to the forearm. Since the elbow is so far back, it is hard to appreciate the full length of the upper arm from this angle.

draw right arm of man running

There is some foreshortening with the left arm too, as it is in the foreground. For this reason, the arm may appear shorter than it should compared to the torso.

draw left arm of man running

Foreshortening the Legs

The runner’s right leg is extended. Since the upper thigh is farther back, it should seem slightly shorter than usual compared to the lower leg. Draw the sole of the shoe to indicate the runner’s foot getting ready to meet the pavement again.

draw right leg

The left knee in the background is drawn much lower than the raised right knee in the front. The left lower leg should be barely visible since it is pointing to the area behind the runner. As for the running man’s left foot, this time we will see the top of the shoe.

draw left leg

[adrotate banner=”3″]

Draw the Head

Draw in some details for the man’s face, head, and neck. Since he is running, you might want to draw loose hair with strands scattered in different directions, tired-looking eyes and eyebrows, and an open mouth that is catching a breath of air.

draw details on the man's face

Draw the Torso

Next it is time to draw the man’s shirt. Keep in mind how the man’s torso twists and turns as his arms move. This will help you to place the folds of the shirt’s fabric. For example, since the right shoulder is twisting back and pulling the shirt from below, there are folds flowing up from the man’s bottom left toward the upper right. Plan to draw spiral folds and other basic fold types for a realistic rendering of the shirt.

begin drawing folds on the shirt

Draw the Arms and Hands

Finish drawing the sleeves of the shirt. Then move on to drawing the arms, adding a little muscle definition. Next, sketch in the fingers and complete the hands. People do all kinds of things with their hands while running. Sometimes they keep the hands loose while other times the hands are clenched fists. Draw them in a way that is easy for you. The man running in this picture also has a watch to time himself.

draw folds on the man's shirt

Draw the Legs and Shoes

Complete the man’s running shorts, with fabric folds coming from the inner legs moving back and forth. Add some definition to the thighs and right knee. Also draw in some lines to detail a lean shin. Afterward, draw in some details to indicate the sole of the right shoe and the top of the man’s left shoe.

draw details on the man's legs

Draw Finishing Touches on the Running Man

If you haven’t been doing so up to this point, it is a good idea to take a step back and look at your drawing. Mostly look at the proportions and foreshortening that might have looked distorted after your initial basic outline. Sometimes, a drawing that has foreshortening will look less distorted after more details are added.

Erase any unwanted guidelines in the face or other parts of the figure. Add in as much shading and extra details as you want.

draw final shading details of man running

A simple yet cool effect to enhance the appearance of running is to place a little shadow under the foot, showing it is off the ground.

And that is how to draw a man running!

man running final drawing

Tutorial Recap

For a quick visual recap of this tutorial, take a look at the image below. It shows you a step-by-step summary progression for how to draw a man running.

how to draw a man running recap

Final Thoughts

Besides the foreshortening of the arms and legs, you can see that it is not much different from drawing a man who is standing. The next time you feel like drawing and you decide you want to draw a man running, I hope you take the tips from this tutorial and “run” with them!

[adrotate banner=”4″]

How to Draw Someone Drinking Beer

how to draw someone drinking title

In this drawing tutorial, we’re going to see how to draw someone drinking a glass of beer.

Why did I choose this as a drawing subject? Well, sometimes when you are thinking of what to draw, it’s good to think about the events of everyday life and how to capture some of those events on your drawing paper.

This will be a freehand observational sketch. In this sketch, we’ll have the man facing to the right sipping on a glass of beer, and the man’s face will be in profile view.

Here is a look at the reference photograph I used while sketching this.

how to draw someone drinking reference
File ID 42478878 | © Gstockstudio1 | Dreamstime.com

Again this will be all freehand without a grid, ruler, or other tools, but I encourage you to play the video below and sketch along with me, pausing the video whenever needed to take a closer look and keep up. You can also look below the video for step by step directions and images.


Sketch the Man’s Head and Below the Neck

We’ll begin by sketching a rough outline of the head and the guideline where the eyes will be and another guideline for where the nose should be. These lines should be parallel to one another, and the guideline for the nose should be roughly halfway between the eye guideline and the chin. Then start sketching the shape of the forehead.


We can also start sketching the shape of the nose itself. Be careful not to make the nose protrude too much. Carefully sketch the shape of the nostril and the wing of the nose next to it. Sketch a short line running along the length of the nose to define the bridge.


Next we’ll draw the eye. So the eye will be farther back a little in the skull of the head. Notice the light vertical guideline that aligns the eye with the side of the nose. The man’s eyes are closed, so we can only really see the top eyelid and some indications of the eyelashes. To sketch the eyebrow, draw the basic outline first, and then sketch in the hairs flowing in the same direction as the hairs of the eyebrow.


About one third of the way down from the nose to the chin, start sketching the lips. Remember, his lips are slightly parted so the drink can enter his mouth. The bottom lip will be resting on the glass that he’s drinking from and the top will be extended a little farther just inside the glass. Start shaping the chin now too.


Continue to form the jawline and work your way up to the ear. The ear should fall between the guideline for the eye and the guideline for the nose that was drawn earlier. Note the different shapes that make up the outer ear, and put shading along these shapes to give the ear a more realistic form.


Next, we can start sketching the hair. I sketched a rough outline of the hairline to begin with, and now I’m trying to shade in some of the hairs of the head, being aware of the flow and the direction of the hair. As you shade, use more pressure on your pencil for darker areas like behind the ear.


Since this man has a beard, we’ll sketch that next. We don’t want these hairs to be as thick as the hairs on his head, but we do want to draw some of the fine lines that are visible of the beard. Put some light hatch lines as an undertone for the beard, and then layer the hairs on top of that.


We might say this is a man who just got off work and stopped for a drink since we see him in a tie, so let’s make the neckline collar, and we’ll sketch a slightly loosened tie underneath. Also, put some light shading on the collar itself to show some of the subtle folds in the clothing.

Sketch the Glass and the Man’s Hand

Okay, now if we want to draw this person drinking, we need to start working on the glass. We can start with the rim of the glass. It’s at an angle from the man’s lips, and we want to make sure that it’s touching his lips. Sketch a long, thin, oval shape for the opening, but not too long. The length of the opening will affect the size of the glass


From that, we’ll want to form the shape of the glass itself. Try your best to keep a symmetrical shape from top to bottom. This drinking glass is wide at the top and starts to get more slender near the bottom. Sketch the bottom so it’s at the same angle as the rim on the top.


Sketch the drink inside of the glass going towards his mouth. Do this with two parallel lines for the foam at a level horizontal to the ground. Start sketching the fingers of the hand that is holding on to the glass. We see the thumb underneath and the fingers on top.


Continue to work on the arm by drawing the cuff below the hand and the sleeve of the man’s shirt. Again, add shading to indicate shadows as well as the folds in the clothing.


Next, we want to sketch some lines in the glass to try to make it look like glass. So we’re just sketching some lines that can serve as reflections. Try to make the lines go along with the contours of the glass. You might also notice that there is a slight line indicating the hand connecting the thumb to the index finger, but you can barely see because the glass is blocking the view.


Now we’ll shade the drink inside of the glass. When we shade the drink inside, we want to work around the highlights and the reflections that we put in the glass in the last step. Add other details, like making tiny circles for the foam from the beer clinging to the inside of the glass near the top.


Look for any finishing touches that need to be added, like maybe darkening some parts of the glass or the man’s beard. Take a step back and look at your sketch. Touch up any other areas that need attention.

And that’s how to draw someone drinking beer!

Now that you have completed this tutorial, see if you can draw someone drinking other beverages!

[adrotate banner=”4″]