How to Draw a Cylinder in Perspective (3 Different Ways)

The geometry of a cylinder is simple enough. It is a three-dimensional, tubular (hollow or solid) object with a circle at each end. Still, it can be tricky to draw sometimes. So how do you draw a cylinder accurately? One way to do so is if you draw the cylinder in perspective.
In this tutorial, we will learn how to draw a cylinder using one-point, two-point, and three-point perspective. In each instance, we can begin by drawing another three-dimensional shape, the rectangular prism, with a square face at each end.
With some basic geometry and a few additional steps, we can easily draw a circle within each square. We can then carve a cylinder out of the rectangular prism!
Once you learn how to draw a cylinder, you can look for cylinders in other things you draw and then draw them more easily.
Keep reading to learn how to use perspective to draw a cylinder!
Table of Contents
Materials Used for These Drawings
Here is a list of the materials I am using for these drawings.
If you don’t have some of these materials, that’s okay. You can still make do with a regular pencil and eraser, as long as you just get started!
If you wish to purchase any of these materials, they can be found at your local art store, or you can buy them using the links below.
Affiliate Disclaimer: The links below are affiliate links. I will receive a small commission if a purchase is made through one of these links. Learn more here.
- 2H and 2B graphite pencils
- 3 sheets of 9” by 12” drawing paper (one for each cylinder)
- Ruler
- Kneaded eraser or plastic eraser
- Dusting brush
How to Draw a Cylinder in One-Point Perspective
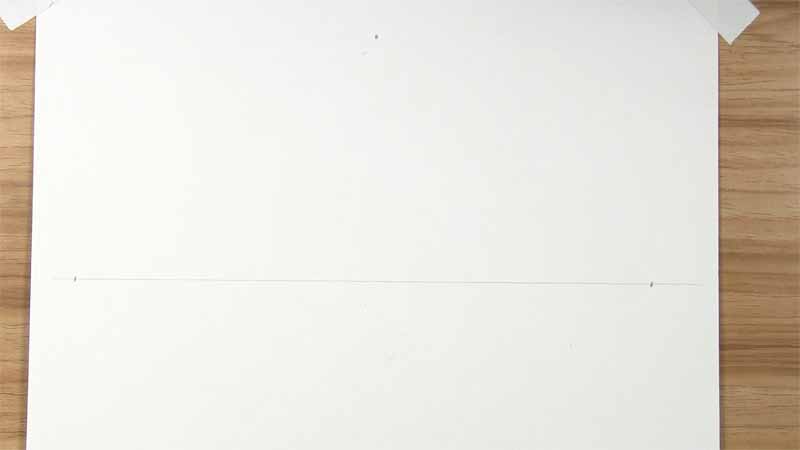
The first cylinder we will draw will be in one-point perspective. This will be a vertical cylinder below the horizon line.
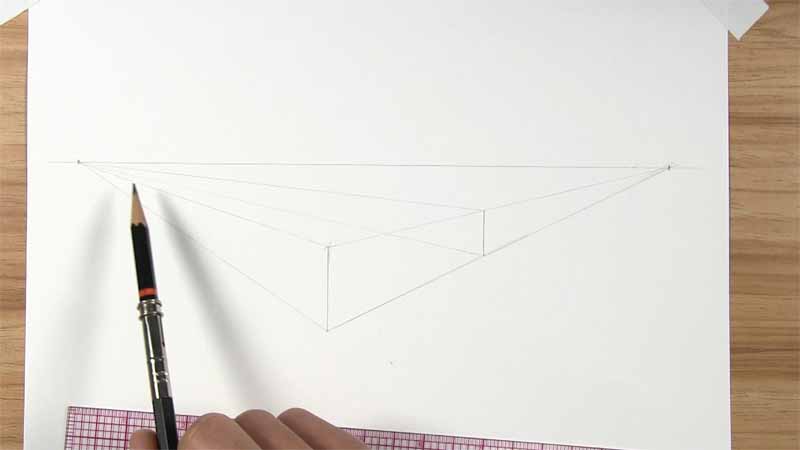
Draw a Vertical Rectangular Prism
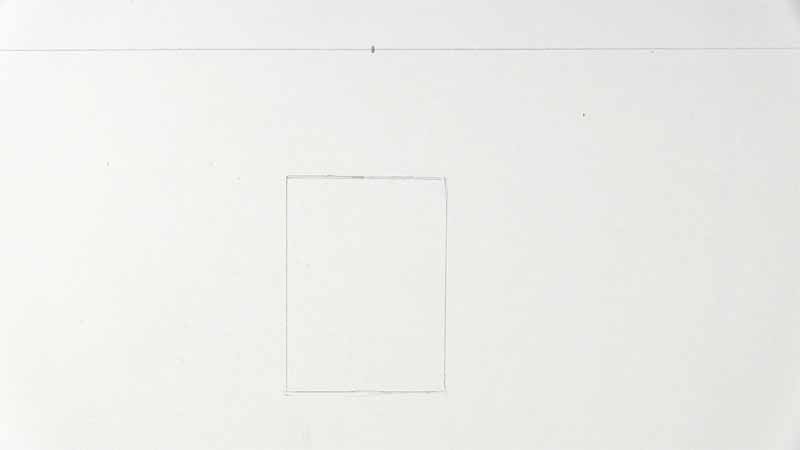
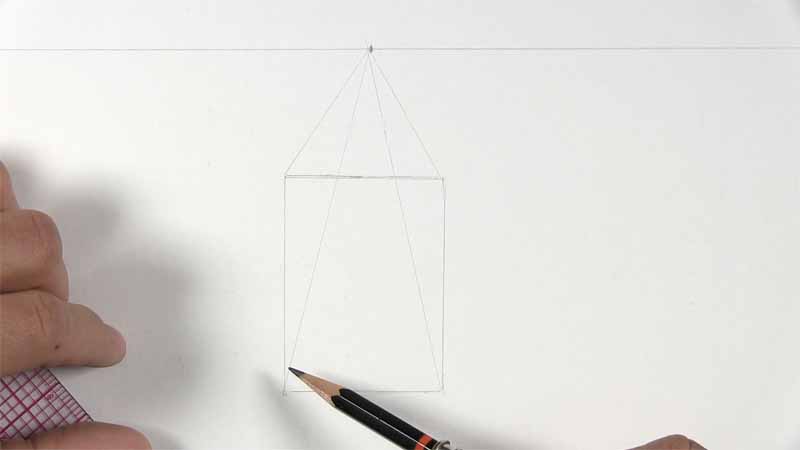
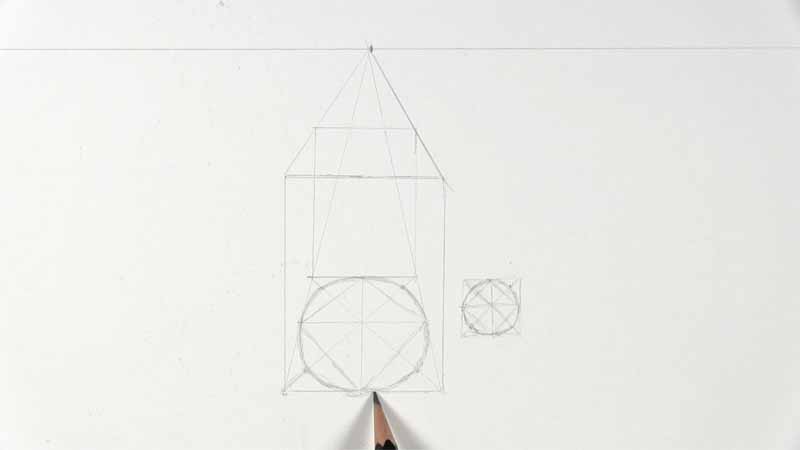
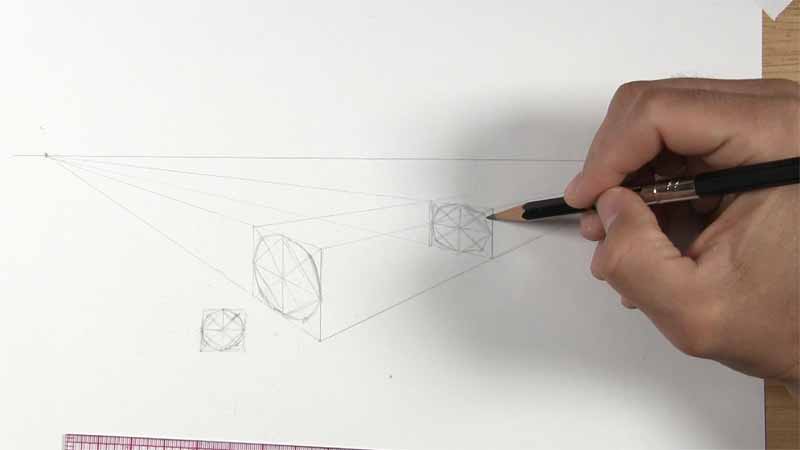
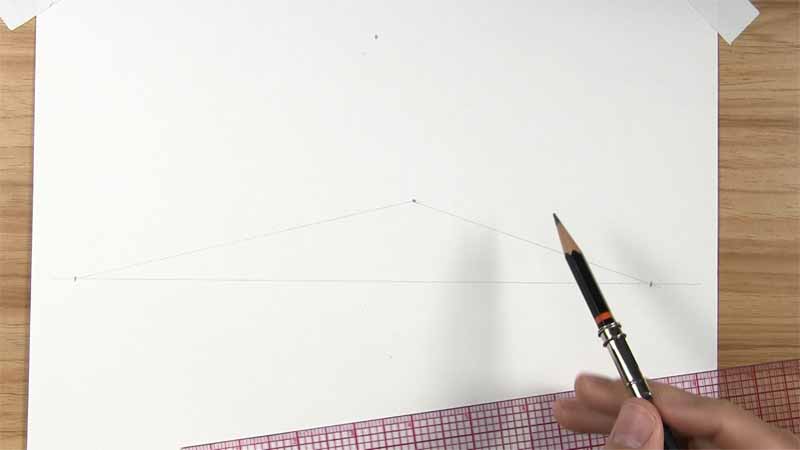
We will start by drawing a rectangular prism and then carving a cylinder from the prism shape. Begin by drawing a horizontal line across the paper. This is called the “horizon line” and represents the viewer’s eye level. Then draw a single dot on the line. This line is called the “vanishing point” and represents the viewer’s line of sight. Draw a standing rectangle directly below the vanishing point.
Then draw lines connecting each corner to the vanishing point. Make sure to use your ruler to keep your lines straight and alignments to the vanishing point correct.
Now, we’re going to draw the square base of the rectangular prism. Even though the view would normally be hidden from us, we need to see it in order to eventually draw the round base of the cylinder. Draw a diagonal line from one corner of the base. You can “eyeball” this diagonal so that it splits the 90-degree corner into two 45-degree angles. Since the corners of a square consist of two 45-degree angles, identifying this diagonal can help us find the approximate location of the horizontal line needed for the top of the square.
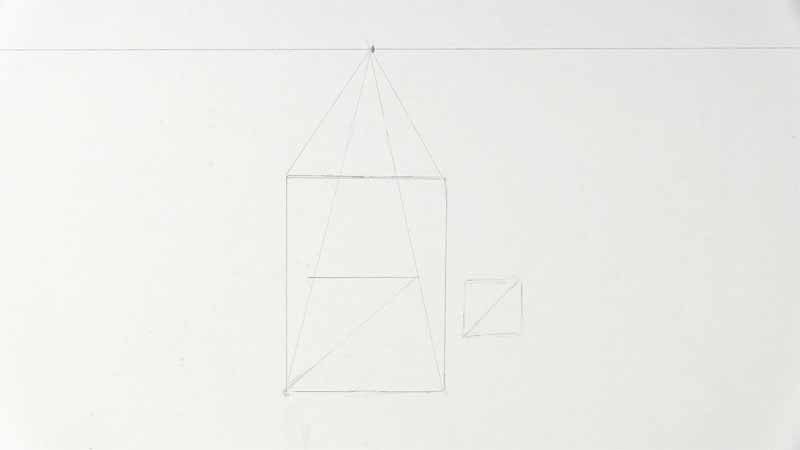
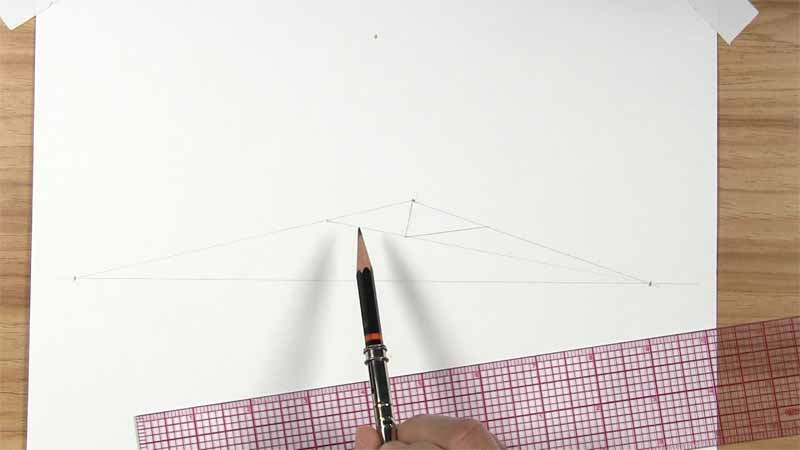
From the top edge of the base square, draw a vertical line from each corner. Then connect these vertical lines with a horizontal line.
Draw Two Circles for the Cylinder
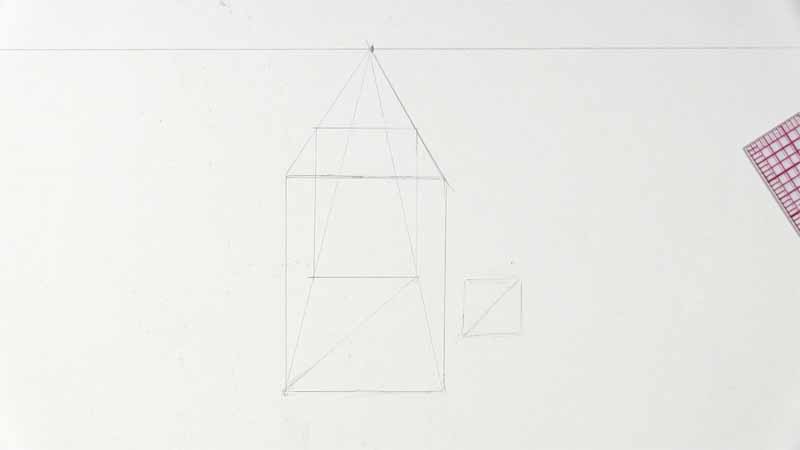
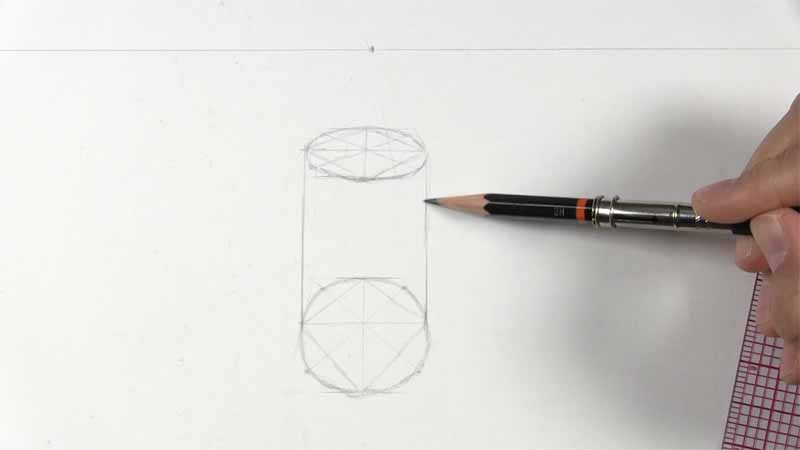
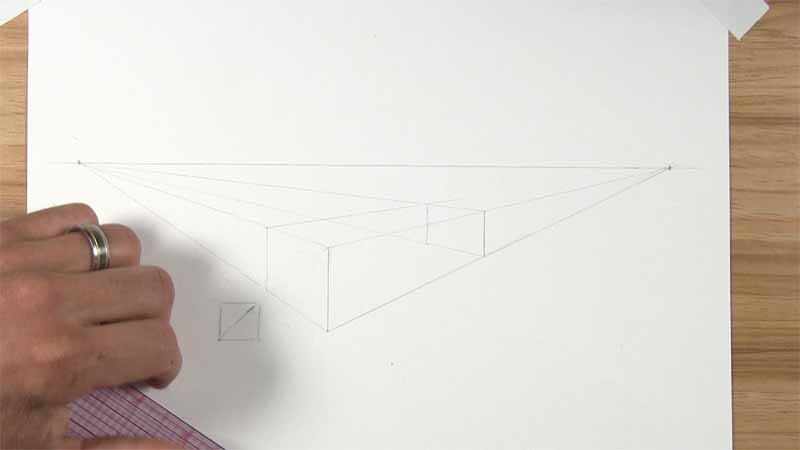
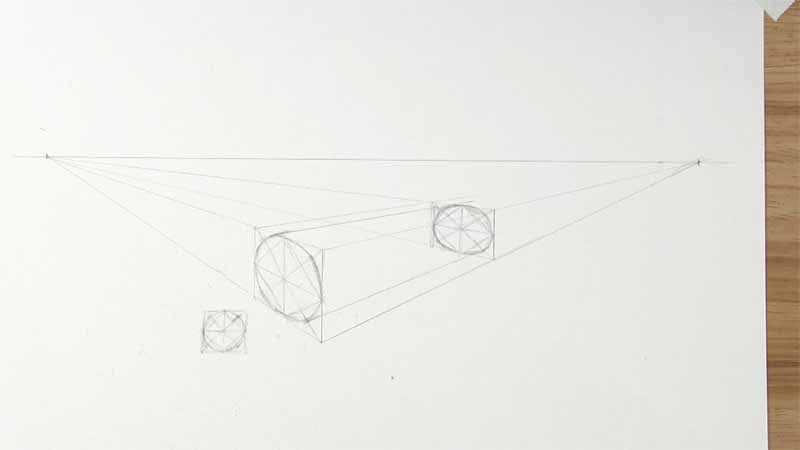
We can use some basic geometric principles to construct the circles of the cylinder. Starting at the bottom square, draw another diagonal so there is an “X”. Then draw a line through the center, leading up to the vanishing point. Draw a horizontal line through the center, too, that creates a plus sign.
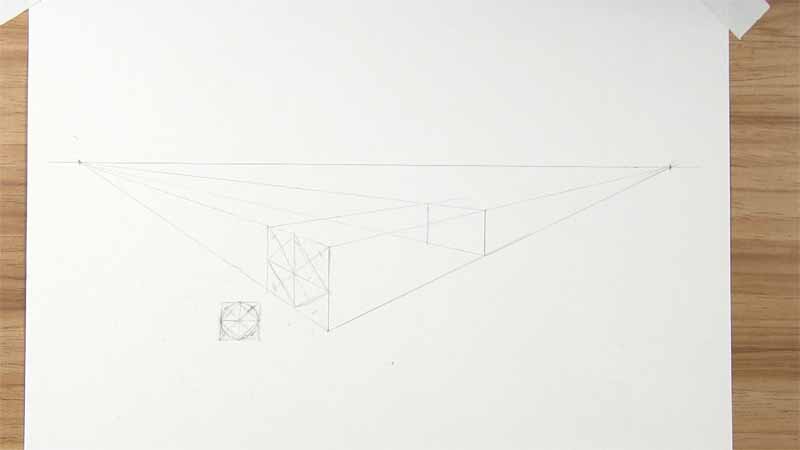
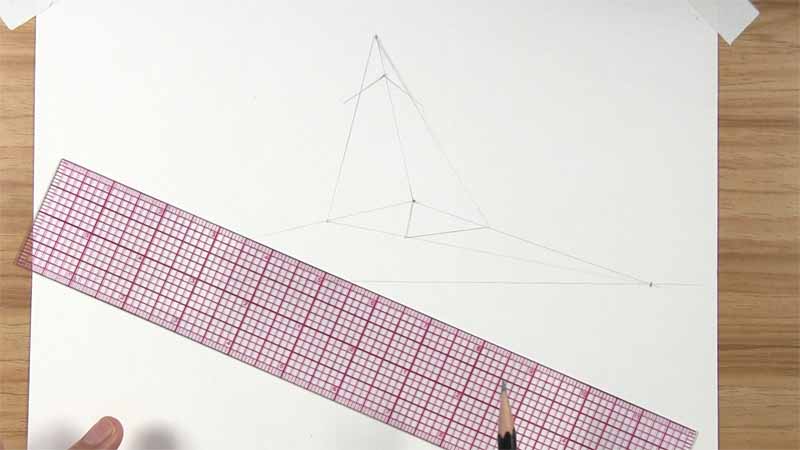
Draw straight lines connecting each tip of the plus sign. This will leave you with a diamond shape. After that, identify and mark the approximate halfway point along each segment of the “X” that is between the edge of the diamond shape and the corner of the square base.
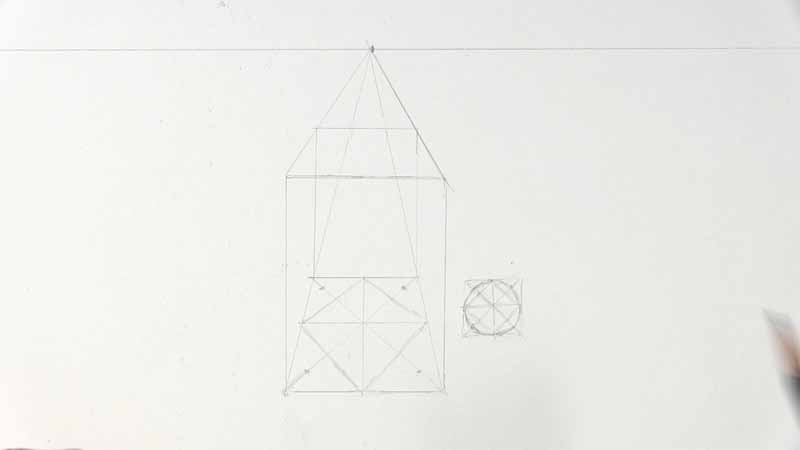
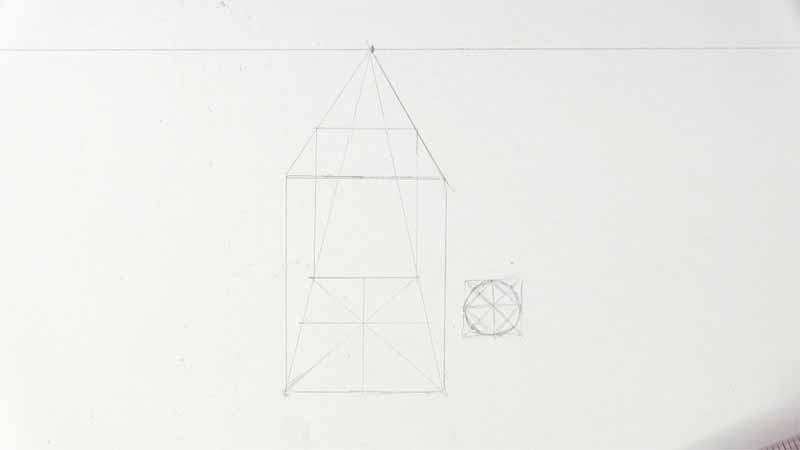
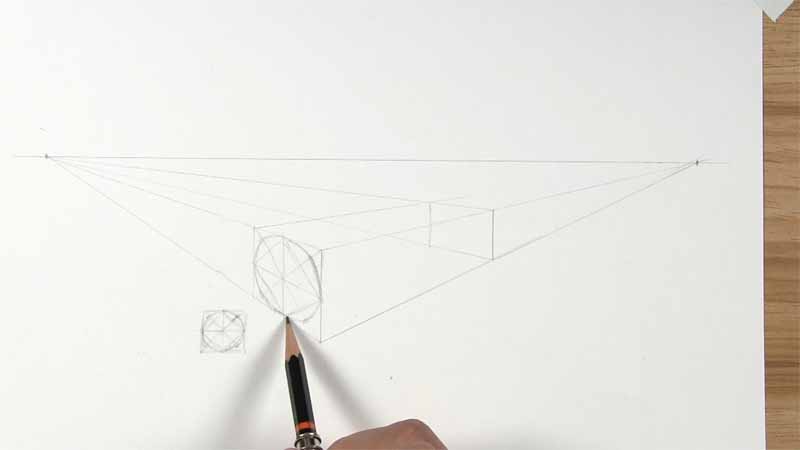
Use the guidelines to draw a circle. Draw curved lines connecting each tip of the diamond shape that also go through the halfway point markings.
Repeat this process to draw the top circle of the cylinder. Start with drawing an “X” and a plus sign. Connect the tips of the plus sign to create a diamond shape. Then mark the points halfway between the diamond’s edges and the square’s corners.
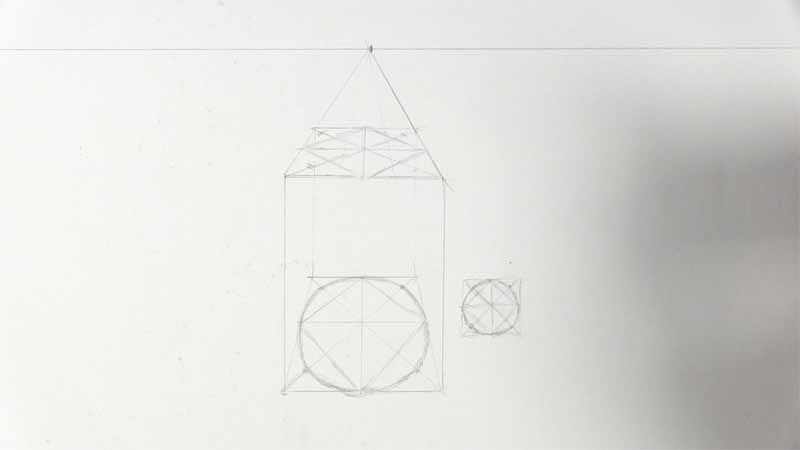
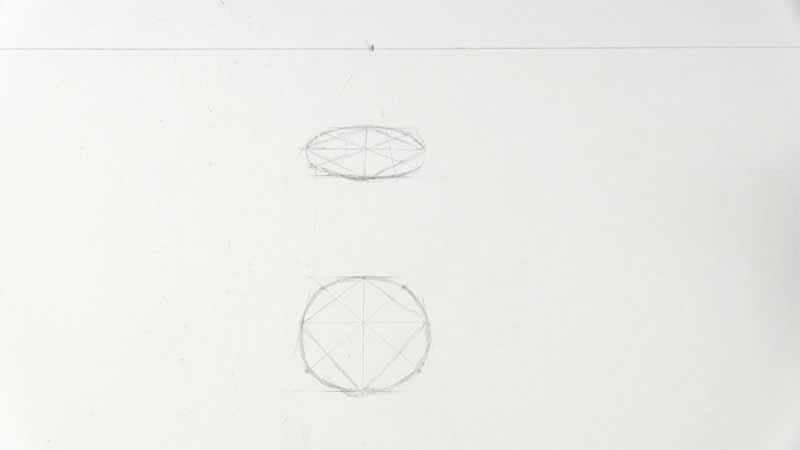
Connect the markings with the diamond’s corners and you will have another circle. Notice how this circle looks significantly narrower than the one below it. This is normal, since the top circle is closer to the horizon line. Top and bottom surfaces of objects far away from the horizon line appear wide. As these top or bottom surfaces get closer to the horizon line, we see less and less of the object.
Draw the Final Steps to the One-Point Perspective Cylinder
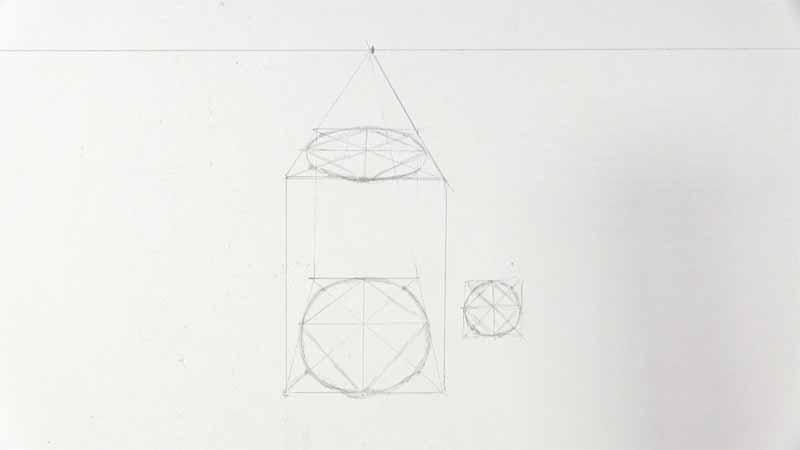
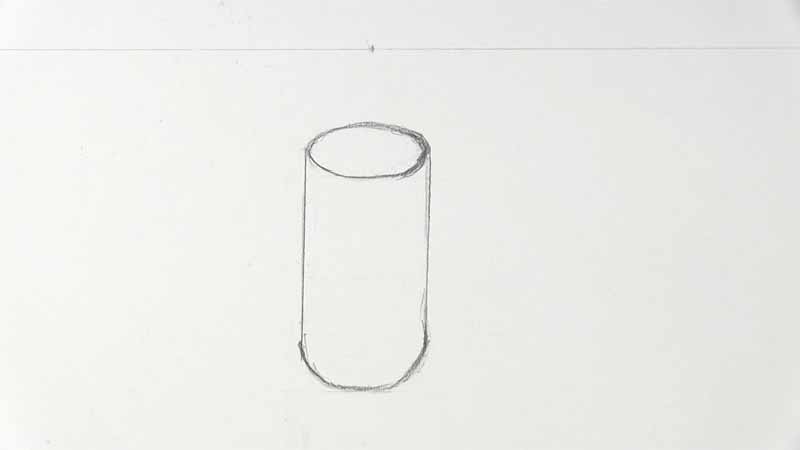
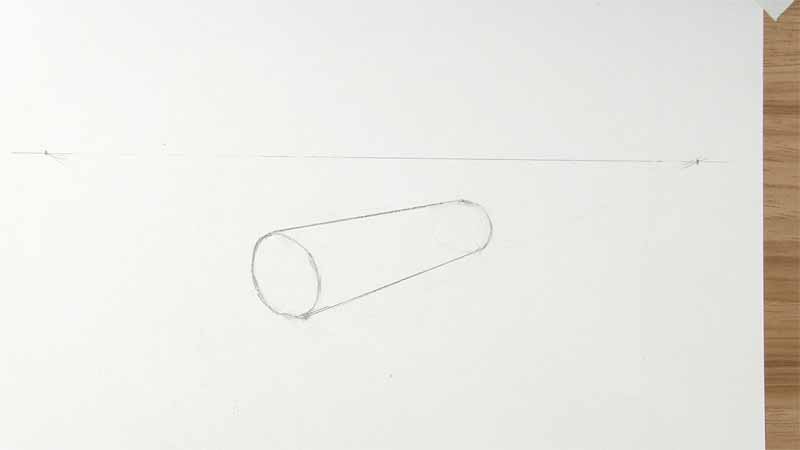
Let’s finish up the drawing of our one-point perspective cylinder. Begin by erasing the guidelines of the rectangular prism and the lines leading to the vanishing point.
Next, draw two vertical lines from each side of the bottom circle to the top circle. There…now it’s beginning to look more like a cylinder!
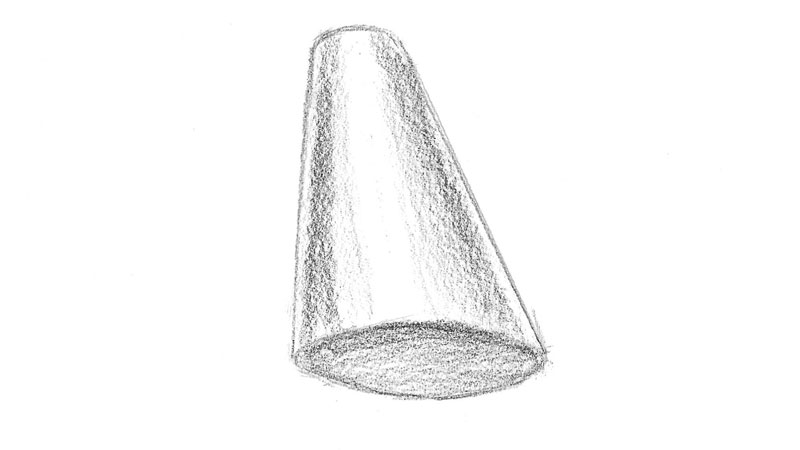
Erase the remaining guidelines. Remember, we are not going to see the bottom circle of the cylinder, so except for the edge along the front, erase that circle completely. Darken the outer edges to better define the cylinder shape.
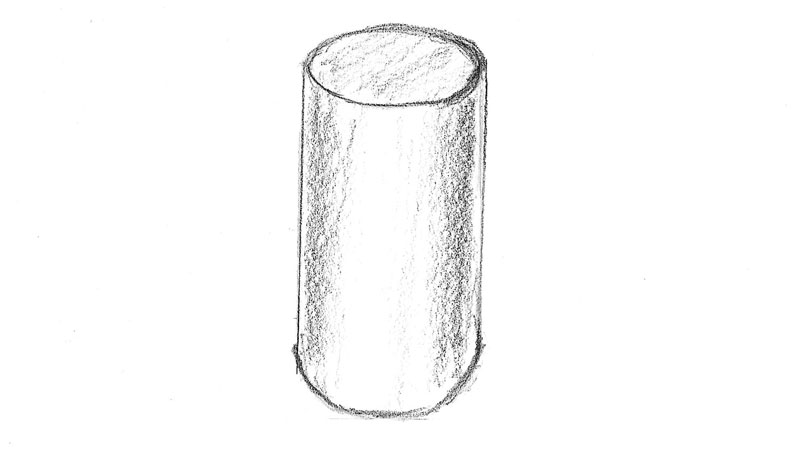
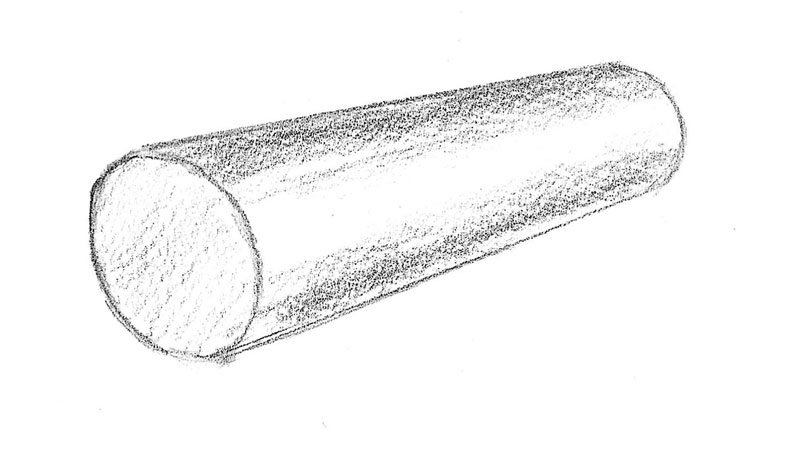
As an optional step, you can add some shading to your cylinder. In this example, I sketched in some quick tones for a basic idea of what shading on the cylinder would look like. If I wanted to shade more realistically, I would not leave the harsh, bold outlines shown here, and I would add a cast shadow.
So that’s one way to draw a cylinder. But you may be wondering, “How do you draw a cylinder on its side?”
How to Draw a Cylinder in Two-Point Perspective
Here’s how to draw a cylinder on its side using two vanishing points rather than just one. This cylinder will also be below the horizon line.
Draw a Long Rectangular Prism
Draw the horizon line with one vanishing point at each end of the line. Then draw a vertical line below the horizon line. This will be the edge of the rectangular prism that is closest to us. Draw lines from the top and bottom of the edge that extend toward each vanishing point.
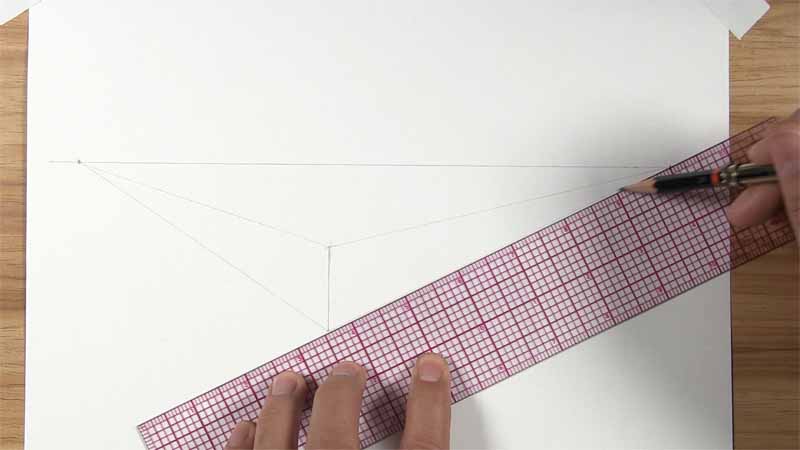
Now draw another vertical line to the right of the first one. This line is for the far end of the prism. Draw lines extending from the top and bottom of this line toward the vanishing point on the left.
Draw a vertical line a little to the left of the first line. What you see next should closely resemble a square shape. There will be some distortion due to the foreshortening of the square receding into the distance. That is the effect of perspective. Connect the top of this line to the opposite vanishing point on the right. Then use a vertical line from the intersecting edges to create the other end of the prism.
Draw a Circle at Both Ends of the Prism
Just as we did with the first cylinder, we are going to use some guideline to help us draw the circle. Draw an “X” and a plus sign, followed by a diamond shape and markings between the diamond’s edges and outer square’s corners.
Use curved lines to connect the diamond tips and the markings. Sketch this curved line loosely and allow yourself to make adjustments as needed to properly shape your circle.
Repeat with the other side. In hindsight, this circle looks a little too elongated for my taste, even when factoring in perspective. If I were to do it over again, I would probably move the other edge of the square slightly closer inward. I would then recheck the first square to make sure it’s not too narrow. Not a super big deal, since we will end up erasing it all except for the outer edge. The takeaway is: if something doesn’t look right, don’t be afraid to experiment with slight positioning variations when drawing in perspective.
Draw Finishing Touches to the Two-Point Perspective Cylinder
Use a ruler to connect the top edge of the left circle with the edge of the right circle AND the vanishing point on the right. All three points should be in alignment. If they are, then draw a line from the left circle to the right one. Repeat with the bottom edges of each circle.
Erase the guidelines used to create the rectangular prism and the circles of the cylinder. Remember to erase all of the circle on the right except for the outer edge.
If you wish, draw a darker outline around your cylinder shape and/or sketch in some shading to give it even more form. Notice the long strip of highlight along the middle and a narrow strip of reflected light along the edges to make the cylinder appear more curved.
How to Draw a Cylinder in Three-Point Perspective
So, we have learned how to draw a cylinder with one and two vanishing points, but what about three? In this final example, we will draw a cylinder in three-point perspective. This cylinder will be vertical as with the first cylinder we drew. However, unlike the first and second cylinders, we will draw this one above the horizon line rather than below it.
Draw a Tall Prism Above the Horizon Line
You can watch this video to see how to draw the prism for this cylinder, or you can continue to read the next four steps below.
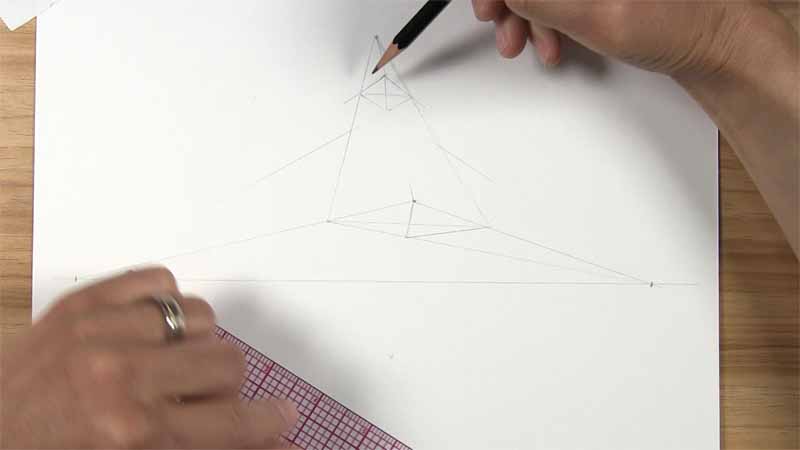
Draw a horizon line across the lower portion of the paper. Place a vanishing point at each end of the line, just like we would do with two-point perspective. Then, draw a third vanishing point centered far above the horizon line.
I could have centered this cylinder directly below the third vanishing point. Instead, I decided to mix it up a bit and place the cylinder a little to the right of the vanishing point. This will leave us with a cylinder that appears slightly tilted and pointing toward a distant point in the sky. First things first, though. Let’s start by marking a dot for the closest corner of our rectangular prism. Draw a line from this dot to the two vanishing points on the horizon line.
To the left of the dot, choose an arbitrary point along the line and connect it to the vanishing point on the right. Then from the first corner, draw a line that divides the corner into two smaller and approximately equal corners. From the other end of this line you just drew, line it up with the ruler to connect it with the left vanishing point to draw the final edge of the bottom square of the prism.
Draw lines from the three visible corners of the prism’s base to the third vanishing point above. Now you should have what looks like a pyramid. To make the top of the rectangular prism, decide on a desired height, mark a point along the edge closest to us, and draw a line from this point to the two vanishing points below.
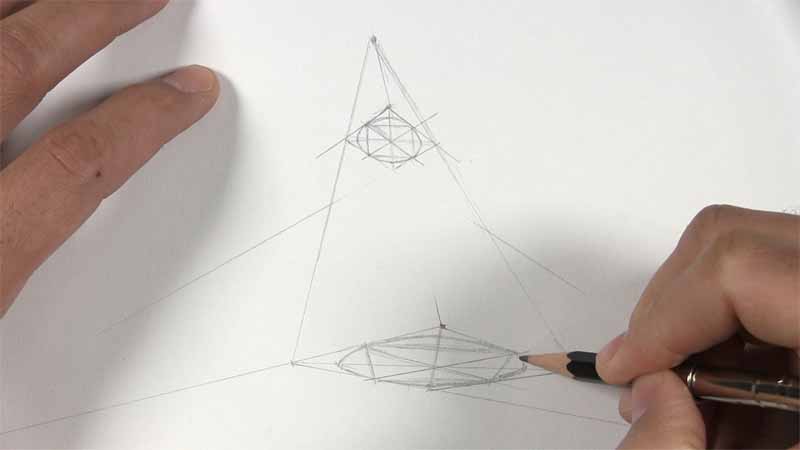
Draw a Circle at the Top and Bottom
Create the square at the top of the prism by connecting each corner with the opposite vanishing point on the horizon line. As you know, we can draw a circle in a square if we first have an “X” and a plus sign. Connect each corner within the square to draw an “X”. Do the same to the bottom square.
To create the plus sign for each square, you will need to use your ruler and align the center of the “X” with one vanishing point on the horizon line and repeat with the opposite vanishing point. Once you have a plus sign in the top and bottom squares, draw a diamond shape in each square by connecting the tips of the plus signs. Then, place four marks around each diamond shape (as described earlier) and sketch each circle. If it’s easier, you can create a polygon first by connecting the markings and diamond tips with straight lines.
Finish Drawing the Three-Point Perspective Cylinder
Draw lines that extend from the outer edges of the lower circle to the outer edges of the upper circle. If you extended these lines even farther, they should meet up at the third vanishing point.
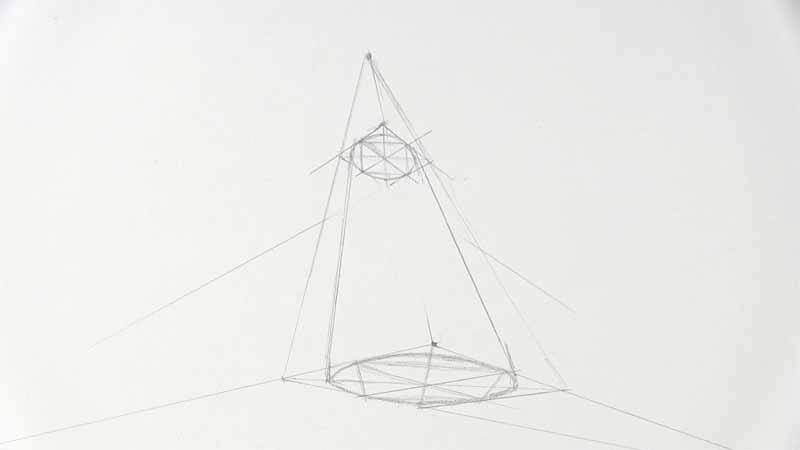
Erase all the construction lines used for the drawing. Reinforce the contour lines. Now you are left with a cylinder in three-point perspective. This is how a cylindrical column might look if it were close to you but just above your line of sight and you were angled to the right of it.
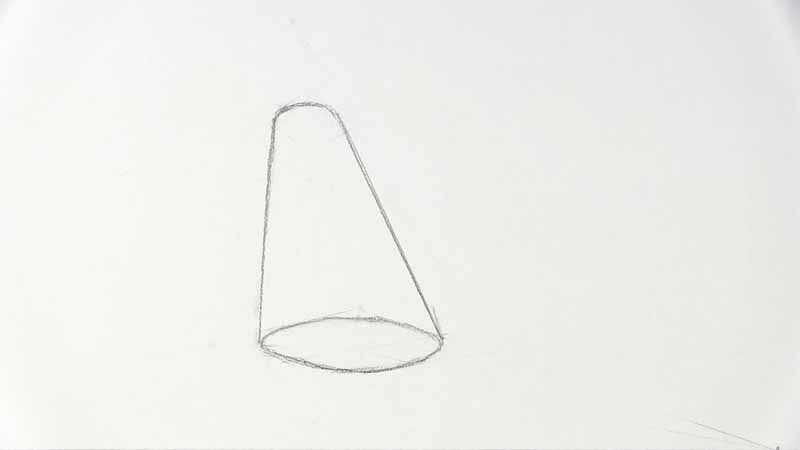
Apply some shading to complete your cylinder. Again, this is an optional step. If you want to take it a step further, add texture representative of the type of cylinder this might be. For example, is it wood or marble? The level of detail and realism is up to you!
Look for Cylindrical Objects to Draw
So now you know three different ways to draw a cylinder in perspective!
You will not always need to use perspective when you draw cylinders. This is especially true when you draw objects shaped like cylinders or other subjects that have cylinder-shaped parts.
Still, having the background knowledge of how to construct cylinders using perspective gives you a solid foundation for sketching cylinder shapes accurately when constructing your drawings.
What are some cylinder-shaped objects you can draw? Here are just a few subjects you can practice:
- Beaker
- Bucket
- Can
- Candle
- Fire extinguisher
- Glue stick
- Lipstick
- Marker pen
- Pipe
- Telescope
As always, the best way to get better at drawing cylinders is with practice.
Get plenty of practice drawing cylinders in perspective in a variety of positions, both above and below the horizon line. After using a ruler for a while, practice drawing perspective cylinders without a ruler.
Then just practice drawing and loosely sketching them as you see them. Even if you are not using a horizon line, you should notice elements of perspective as you draw cylinders from life and from photos. Eventually, you will be able to easy draw a perspective cylinder without any guidelines at all.